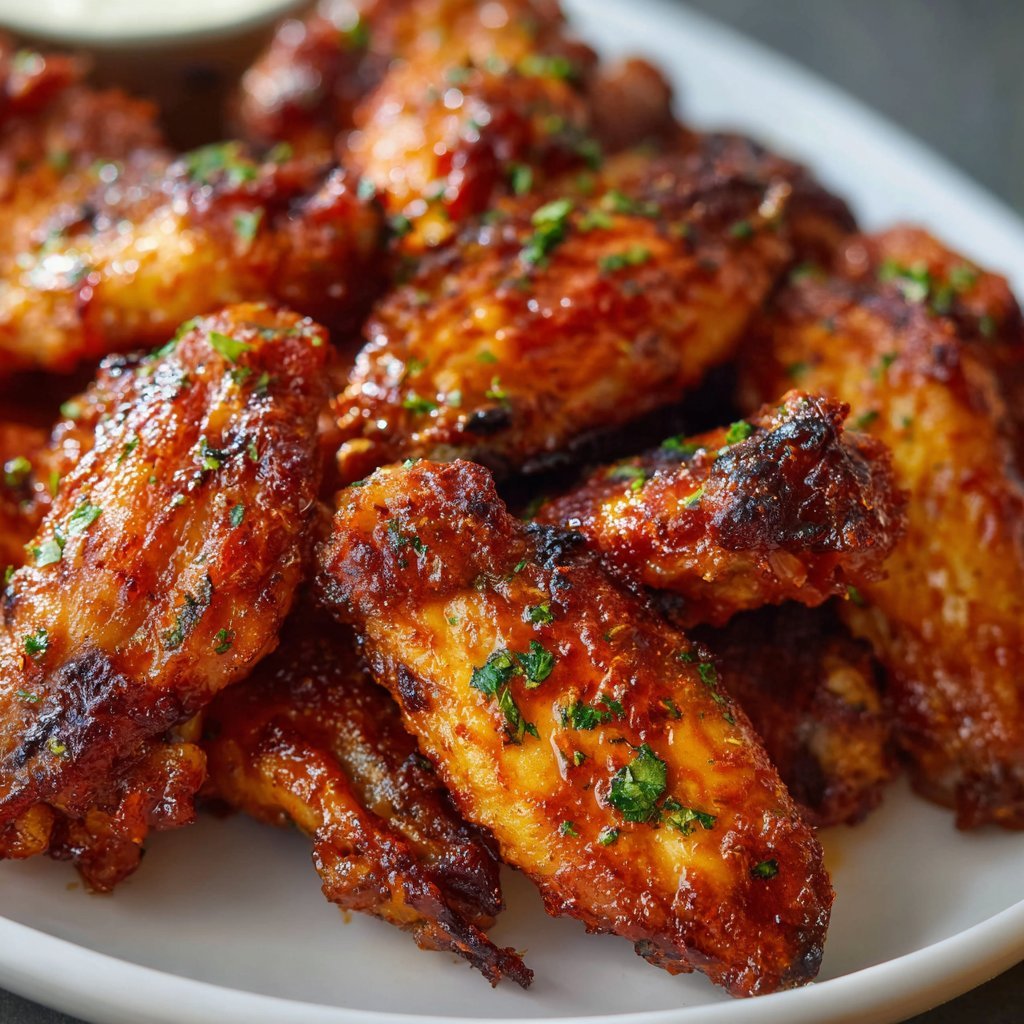
Hey there! So, listen, making wings at home used to feel like a whole production, right? Like, deep fryers are messy and kinda scary, and baking? Meh, they always came out a bit flabby. But then, the air fryer happened! And honestly, my world, or at least my snack world, changed forever. Making air fryer chicken wings is seriously a game changer. It’s what I pull out when friends are coming over last minute, or when I just crave that perfect crispy bite without the guilt (mostly!). My cousin Brenda actually showed me her trick years ago, and I’ve tweaked it just a little since then. It’s simple, it works, and folks, it’s dang delicious.
Why I’m Obsessed with Air Fryer Wings
Okay, so why *these* wings, ya know? Why air frying? Well, for one, there’s way less oil. Like, WAAAAY less. Which means less mess and fewer calories than the deep-fried kind. Plus, they get unbelievably crispy. Like, shatteringly crispy skin without feeling greasy inside. I make this when:
- It’s game day (obviously!).
- I need a super quick appetizer that looks like I tried harder than I did.
- My kids are begging for wings but I don’t want to smell like a fry shop for two days. (Seriously, the smell form deep frying lingers alot).
They’re just… easy. And they satisfy that craving perfectly every single time.
Gather ‘Round: What You’ll Need
This is pretty basic stuff, honestly. You probably have most of it already. Don’t stress too much about measurements, especially for the seasoning part, you can adjust to your taste!
- About 2 lbs (around 1 kg) of chicken wings, separated into drumettes and flats. You can buy them already cut, saves a step!
- 1-2 tablespoons of olive oil or other neutral oil (avocado oil works great too).
- 1-2 teaspoons baking powder (Key ingredient for crispiness! Don’t skip this! And yes, baking *powder*, not baking soda).
- Salt and black pepper to taste.
- Your favorite wing seasoning mix. I usually make my own with garlic powder, onion powder, paprika (smoked paprika if I’m feeling fancy), maybe a pinch of cayenne if we want some heat. But honestly, any pre-made chicken or wing rub works fine here. Sometimes I just use Lawry’s Seasoned Salt if I’m feeling lazy or outta other spices!
- Optional: Your favorite wing sauce for tossing afterwards (Buffalo, BBQ, Garlic Parm, whatever floats your boat!).

Let’s Get Cooking: The How-To
Okay, deep breaths. This is easy peasy. Just follow these steps and you’ll be munching on crispy goodness in no time.
- Prep Those Wings: First thing’s first, you gotta get those wings ready. If they aren’t separated yet, grab a sharp knife and cut ’em at the joint. You can toss the wing tips, or save ’em for stock if you’re super thrifty! This is where my kitchen always gets a bit messy, just embrace it.
- Dry, Dry, DRY!: This is probably the MOST important step for crispy wings. Pat those wing pieces down *really* well with paper towels. Get ’em as dry as humanly possible. Like, bone dry. Seriously, this makes a HUGE difference in crispiness.
- Seasoning Time: Pop the dried wings into a large bowl. Drizzle the oil over them and toss to coat evenly. Then sprinkle the baking powder over the top. Toss again until the baking powder is evenly distributed – it might look a little weird and pasty, but trust me, it’s magic. Now, add your salt, pepper, and seasoning mix. Toss, toss, toss until every single piece is well coated. Get in there with your hands if you need to!
- Into the Air Fryer: Preheat your air fryer to 400°F (200°C). Arrange the seasoned wings in a single layer in the air fryer basket. Do NOT overcrowd the basket! This is crucial for air circulation and crispiness. You’ll probably have to cook them in batches.
- Air Fry Away!: Cook for 20-25 minutes, flipping the wings halfway through (around the 10-12 minute mark). Cooking time can vary depending on your air fryer model and how many wings you’re cooking in a batch. You’re looking for them to be golden brown, cooked through, and super crispy on the outside. This is where I usually peek and maybe even sneak a tiny drumette to check for crispiness… strictly for quality control, of course.
- Sauce ‘Em (Optional but Recommended): Once they’re done, you can toss the hot wings in your favorite sauce in a clean bowl, or just serve them plain with sauce on the side for dipping. Frankly, they’re so good plain you might not even need sauce!
- Serve!: Get ’em out while they’re hot and crispy!
Notes from My Kitchen (Lessons Learned)
- Okay, I said it already, but seriously, patting them dry is key. I forgot once, and they were… fine. But not *amazing* crispy.
- Don’t be shy with the baking powder, but don’t use too much either. About 1-2 teaspoons per 2 lbs is the sweet spot I’ve found. Too much can leave a weird aftertaste.
- Every air fryer is different! Mine runs a little hot, so I sometimes shave a minute or two off the cooking time. Keep an eye on your first batch.
- Batch cooking is annoying, I know. But cramming too many wings in just steams them instead of air frying them crispy. Patience is a virtue, especially when wings are involved.

Mix it Up: Wing Variations
I’ve messed around with different flavor profiles over the years. You can do so much with just the seasoning! Here are a few ideas:
- Lemon Pepper: Just use a good lemon pepper seasoning blend instead of the savory one. So simple, so good.
- Garlic Parmesan: Skip the sauce toss and after air frying, immediately toss the hot wings in melted butter, minced fresh garlic, and grated Parmesan cheese. Divine.
- Spicy Dry Rub: Amp up the cayenne or add chili powder to your seasoning mix for wings with a kick without being saucy.
- Asian Inspired: I tried doing a sticky soy ginger glaze *in* the air fryer once and… yeah, not so great. It made a sticky mess and didn’t get crispy. For Asian flavors, I recommend air frying them plain/with just salt and pepper, then tossing in a warm sauce afterwards. Learning form mistakes, right?
The Right Tools for the Job
Obviously, you need an air fryer! Any model works, honestly, basket style or oven style. A good pair of tongs is super helpful for flipping those hot little guys. And a big bowl for tossing is essential. If you don’t have an air fryer basket or rack that’s easy to clean, I sometimes use these parchment liners designed for air fryers, they make cleanup a breeze (just make sure you put the food on them before preheating so they don’t fly around!).

Storing Your Wing Haul
If you somehow manage to have leftovers (a rare occurrence in my house, I’ll be honest), let them cool completely. Pop them in an airtight container in the fridge for 3-4 days. To reheat, the air fryer is your best friend again! Just toss them back in at 375°F (190°C) for 5-7 minutes until they’re hot and crispy again. Avoid the microwave if you can – makes them rubbery, ew.
My Go-To Serving Style
For a casual spread, I like putting out a big platter of sauced and unsauced wings. Serve ’em with classic dipping sauces like ranch or blue cheese and plenty of celery sticks and carrot sticks. If I’m making it a meal, a simple side salad or some roasted broccoli works nicely to balance out the richness. But usually? It’s just a pile of wings and maybe some napkins, ha!
Couple More Pro Tips (Learned the Hard Way)
- Don’t Rush the Dry Step: I mentioned it, but seriously, if they aren’t dry, the baking powder won’t work its magic properly and they won’t get truly crispy. Pat ’em dry, maybe even let them air dry uncovered in the fridge for an hour or two after patting if you have time (this is Brenda’s *real* secret).
- Preheat Your Air Fryer: Just like a regular oven, preheating helps things cook more evenly and get crispy faster. Don’t skip it!
- Listen for the Crisp: As they get close to being done, you’ll often hear them crackling in the air fryer. That’s the sound of success, folks!
Burning Questions? Let’s Ask ‘Em.
Okay, got questions? Lemme try and answer some common ones I get…
Q: Can I use frozen wings?
A: Yep! But you gotta thaw them completely first. Trying to air fry them from frozen won’t work right, they won’t cook evenly and won’t get crispy. Thaw ’em in the fridge overnight, or carefully under cold running water.
Q: Why the baking powder? What does it DO?
A: Ah, science! The baking powder (specifically the aluminum-free kind, I hear) raises the pH of the chicken skin. This helps the proteins break down and leads to a crispier result. Plus, it helps draw moisture to the surface which then evaporates in the hot air. Magic, I tell ya!
Q: My wings aren’t getting crispy! Help!
A: Okay, troubleshoot time. Did you dry them enough? Did you use baking powder? Are you overcrowding the basket? Is your air fryer actually hitting the right temperature? Try cooking them a little longer, maybe increasing the temp slightly for the last few minutes if needed. But honestly, 9 times out of 10, it’s not drying them properly or cramming too many in.
Q: What’s your favorite sauce?
A: Oh man, tough one! For classic Buffalo, I always go with Frank’s RedHot. Can’t beat it. But a good homemade garlic parm is pretty epic too. Depends on my mood!
Alright, there you have it. My super-duper easy, gets-you-crispy-results air fryer chicken wings recipe. Give it a whirl and let me know what you think! Happy snacking!
Ingredients
- 1.5 lbs chicken wings (flats and drumettes)
- 1 tbsp olive oil
- 1 tsp salt
- 1/2 tsp black pepper
- 1/2 tsp garlic powder
- 1/2 tsp paprika
- 1 tsp baking powder (optional, for extra crispiness)
Instructions
-
1Pat the chicken wings thoroughly dry with paper towels. This is a crucial step for crispy skin.
-
2In a large bowl, toss the dried wings with olive oil, salt, pepper, garlic powder, paprika, and baking powder (if using) until evenly coated.
-
3Preheat your air fryer to 400°F (200°C) for 3-5 minutes.
-
4Arrange the seasoned wings in a single layer in the air fryer basket. Do not overcrowd; cook in batches if necessary.
-
5Air fry for 20-25 minutes, flipping the wings halfway through, until they are golden brown and crispy.
-
6Remove from the air fryer and serve immediately, plain or tossed in your favorite sauce.
Approximate Information for One Serving
Nutrition Disclaimers
Number of total servings shown is approximate. Actual number of servings will depend on your preferred portion sizes.
Nutritional values shown are general guidelines and reflect information for 1 serving using the ingredients listed, not including any optional ingredients. Actual macros may vary slightly depending on specific brands and types of ingredients used.
To determine the weight of one serving, prepare the recipe as instructed. Weigh the finished recipe, then divide the weight of the finished recipe (not including the weight of the container the food is in) by the desired number of servings. Result will be the weight of one serving.
Did you make this recipe?
Please consider Pinning it!!