So, these little cheeseburger bombs, hear me out
The first time I made Garlic Parmesan Cheeseburger Bombs, I was late for a potluck and my playlist was doing that weird shuffle thing where it goes from cozy jazz to a 90s banger without warning. I stuffed, crimped, and brushed like a person possessed, and when I pulled them out, the tops were glossy with garlic butter and everyone inhaled them before I found a serving plate. Which is to say, this recipe is forgiving, slightly cheeky, and very much a crowd pleaser.
I make them when I want the vibe of a backyard burger night but it is freezing outside or I just dont feel like flipping patties. Plus, they are fun to eat, like savory bun sized presents with a gooey surprise inside. My niece calls them snack moons. I did not correct her because honestly, adorable.
Quick detour because my brain does this, I once tried to assemble these while my neighbor popped over to return a muffin tin and we ended up talking about travel scarves for twenty minutes. The dough waited politely, and the bombs still baked up beautifully. So yes, the recipe is flexible, and yes, I will always say yes to a chat about packing cubes.
Why you will probably love this
- I make this when I want something cozy but still party ready. It walks that line.
- My family goes a bit bonkers because the centers are melty and the tops are garlicky and salty in the best way.
- If you have picky eaters, these are like burgers but cuter, also easier to dip. I used to overfill them and it got messy; now I keep it chill and it is better.
- When I am tired, I use store dough and no one complains. On second thought, I might prefer it to homemade for these.
- They reheat well, probably even better the next day, though in my house they rarely survive that long.
What you will need
Use what you have, swap what you must. It is a vibe, not a test.
- 450 g ground beef, 80 to 85 percent lean for juiciness
- 1 small onion, finely chopped, or a handful of sliced scallions if that is what you have
- 2 cloves garlic, minced, plus more for the butter
- 1 teaspoon kosher salt and a few cranks of black pepper
- 1 teaspoon Worcestershire sauce, optional but I like the depth
- 1 teaspoon smoked paprika, optional, I just love it
- 1 cup shredded mozzarella or 150 g small cheddar cubes, either melts great
- 250 g grated Parmesan, divided, real Parm is nice, but budget works fine
- 12 pieces of dough, your choice: store pizza dough cut into 12, or 1 can of biscuit dough, or small dinner roll dough. My grandmother swore by a specific brand, but any version works fine
- 4 tablespoons unsalted butter, melted
- 2 tablespoons chopped parsley or a pinch of dried Italian seasoning
- 1 egg, beaten with a splash of water for a shiny top, optional
- Pickles, ketchup, and a quick mayo mustard swirl for dipping
Optional swaps I actually use:
- Ground turkey instead of beef when I am aiming lighter, add a teaspoon of olive oil so it does not dry out
- Pre shredded cheese when I am in a hurry, it is fine here
- Pizza sauce for dipping if the kids are in a pizza mood
Alright, lets make them
- Preheat your oven to 400 F or about 200 C. Line a baking sheet with parchment, or grab a lightly greased cast iron skillet if you want crisp bottoms. I think cast iron is essential for the best sizzle, but if you do not have one, the sheet still works.
- Cook the filling. Warm a skillet over medium heat. Add the beef and onion. Cook, breaking up the meat, until browned with little crispy bits, 6 to 8 minutes. Stir in the garlic, salt, pepper, Worcestershire, and smoked paprika. Cook 1 more minute. This is where I usually sneak a taste, carefully.
- Let the filling cool for 5 to 10 minutes so it does not melt the dough on contact. Meanwhile, stir together the melted butter, 2 tablespoons Parmesan, and parsley. Set aside.
- Prepare the dough. If using pizza dough, divide into 12 pieces and roll into rough circles, about the size of your palm. Biscuit dough is already portioned, give each a quick press so it is wide enough to wrap.
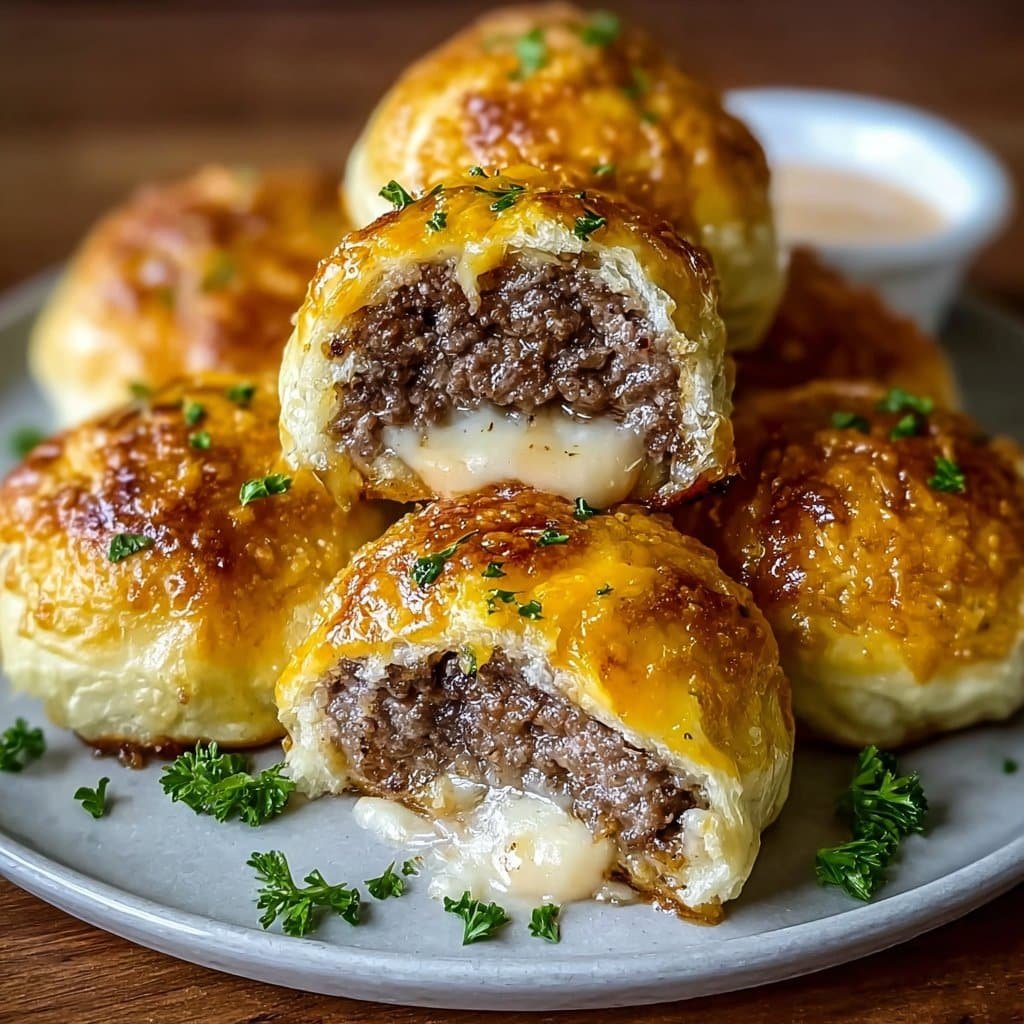
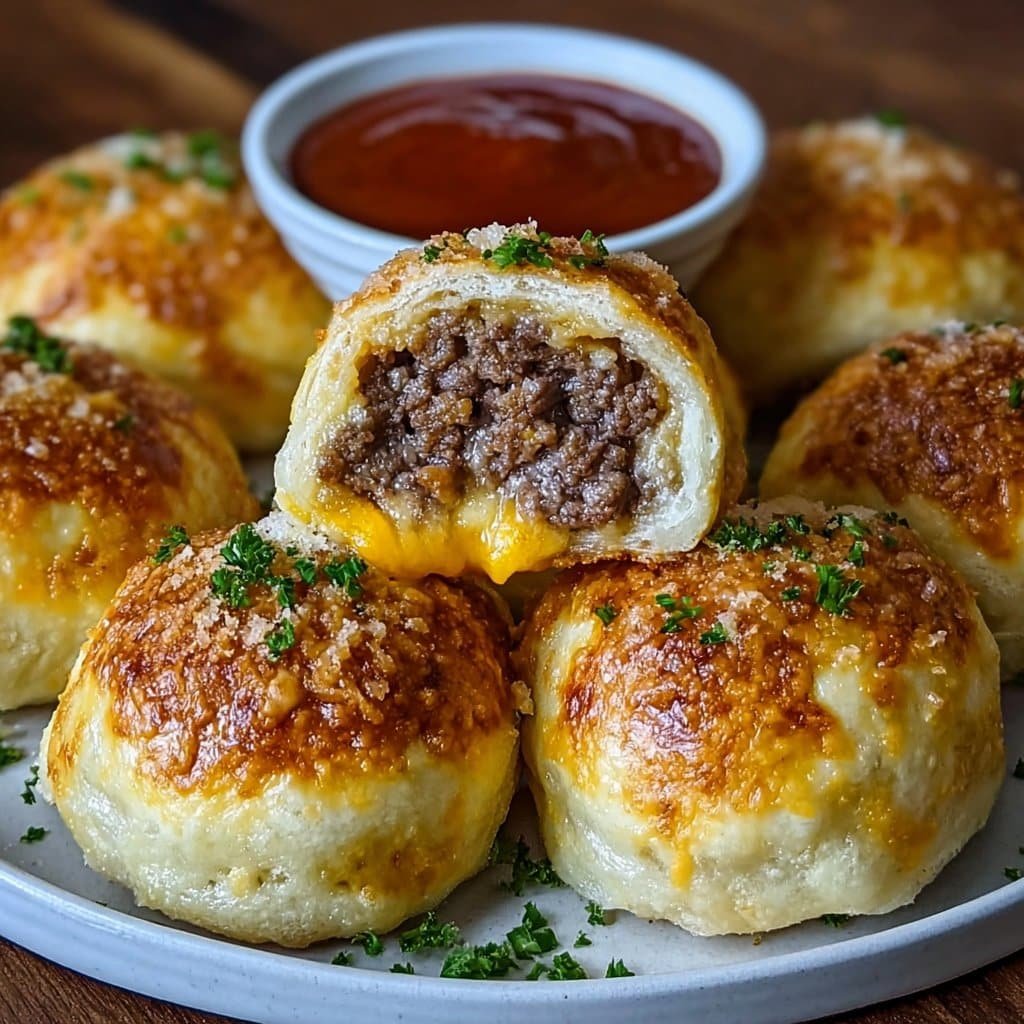
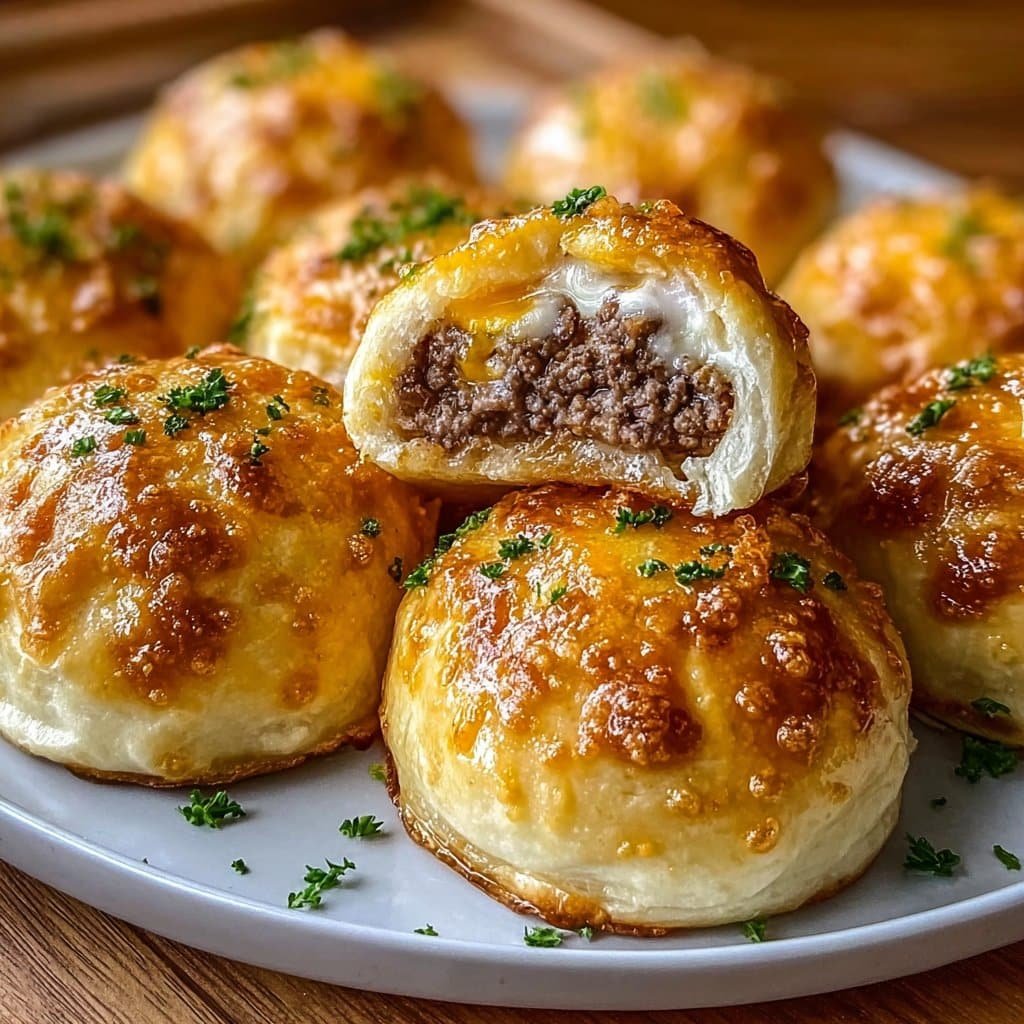
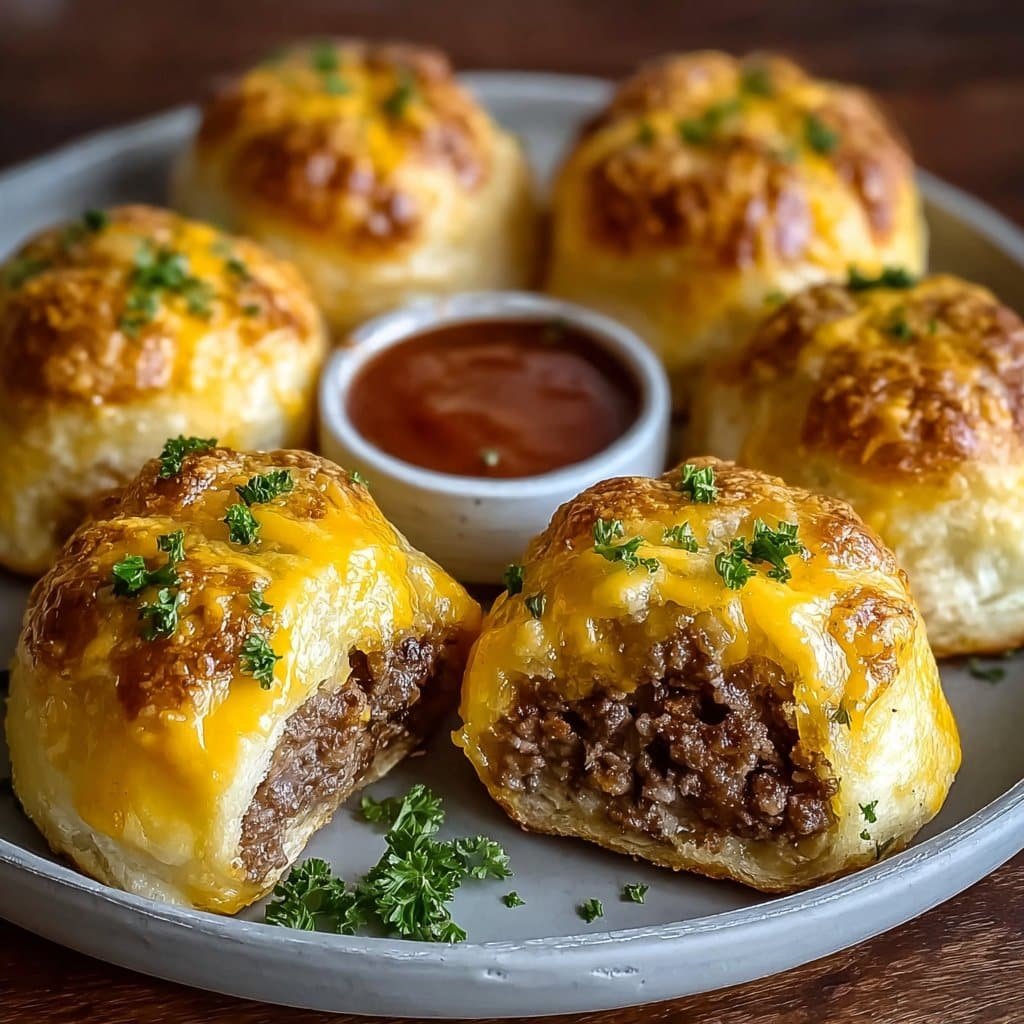
- Fill and seal. Place a spoonful of beef filling and a cube or pinch of cheese in the center of each round. Pull the edges up and pinch shut until you have a tight bundle. Do not worry if it looks a bit odd at this stage, it always does. Place seam side down on the pan.
- Brush tops with a little garlic butter. If using egg wash, brush that first, then sprinkle a little Parmesan. Save most of the Parmesan for after baking, it clings better then.
- Bake for 12 to 16 minutes until golden and slightly puffed. Rotate the pan once if your oven has hot spots. Remove form the oven and immediately brush with more garlic butter and shower with Parmesan. The scent is wild in the best way.
- Rest 5 minutes so the cheese settles. Try not to burn your mouth. Ask me how I know.
Little notes I wrote to myself
- Do not overfill. I used to pack them like a suitcase, and they burst. Two teaspoons filling plus cheese is the sweet spot.
- Cold dough seals better. If your kitchen is warm, pop the filled bombs in the fridge for 5 minutes before baking.
- Actually, I find it works better if I grate the Parmesan very fine so it melts into the butter and sticks to the tops like a savory snow.
- Use damp fingers if the dough resists pinching closed, it helps it listen to you.
Variations I tried, for better or worse
- Jalapeño popper vibe: add a teaspoon of cream cheese with the cheddar and a few jalapeño slices. Very yes.
- Mushroom Swiss: sauté mushrooms, swap mozzarella for Swiss, add a tiny splash of soy to the filling. Cozy and rich.
- Big dill energy: stir chopped pickles and a little pickle juice into the beef. Unexpectedly perfect.
- Buffalo ranch attempt: I tried mixing hot sauce into the butter and adding ranch powder. It got too salty and the color was, well, not cute. I would skip that one.
Gear I use, plus quick fixes
- Cast iron skillet for best bottoms and easy serving. But a sheet pan with parchment is totally fine.
- Pastry brush for the butter, or just use a spoon and your good old fingertips if you are careful.
- Small scoop for portioning the filling, though a regular spoon works.
If you want a quick visual on shaping little buns, I like this bun shaping guide form King Arthur Baking, it is friendly and clear: King Arthur Baking bun guide. For browning meat without steaming it, The Kitchn explains it simply right here: how to brown ground beef. And if you enjoy nerdy cheese talk, this piece on meltiness is a fun read: cheese melt guide.
How to store and reheat
Cool completely, then tuck into an airtight container. Fridge for up to 3 days. Reheat in a hot oven at 375 F for 8 to 10 minutes until warmed through, or in an air fryer for 4 to 6 minutes for that crisp top. You can freeze baked bombs up to 2 months, wrapped well. Thaw in the fridge overnight for best texture. Though honestly, in my house it never lasts more than a day.
How I like to serve these
We set out bowls of ketchup, mustard, and a quick burger sauce, plus pickle chips. Sometimes I toss a simple salad on the side so I can pretend balance. For game nights, I stand the Garlic Parmesan Cheeseburger Bombs in a skillet and put the dips right in the middle. My uncle insists on hot sauce, and he is right. If I am feeling extra, I sprinkle sesame seeds before baking for that burger bun look.
Pro tips learned the stubborn way
- I once tried rushing the cool down and filled the dough while the beef was sizzling hot, and the dough tore. Let it cool a bit, it is worth the minute.
- I tried baking at 425 F to be fast and got too dark tops before the center warmed. Stay around 400 F.
- Seal with confidence. A little twist at the top, then press that nub down so it does not reopen.
- Parmesan on top after baking sticks better than before. I kept losing it to the pan until I changed the order.
FAQ you actually asked me
Can I make these ahead
Yes. Assemble, cover, and chill up to 24 hours. Bake straight from the fridge adding 2 to 3 minutes. Or freeze unbaked on a tray, then bag. Bake from frozen at 375 F for 18 to 22 minutes.
Could I use puff pastry
You can, but it puffs a lot and the filling sometimes escapes. If you try it, tuck the seams under and bake on parchment. Tasty, just a bit extra flaky.
Do I need egg wash
Nope. Butter alone gives a lovely sheen. Egg wash is for a shiny bakery look. I forget it half the time, and no one notices.
What cheese melts best inside
Mozzarella is classic stretchy, cheddar is bolder. Provolone cubes are nice if you like a gentle melt. Avoid super aged Parmesan inside, it does not melt smoothly, keep it on top.
Can I grill these
Short answer, not great. The direct heat is tricky and the bottoms scorch before the centers warm. Oven or air fryer is easier.
How do I keep the bottoms from getting soggy
Preheat the pan in the oven for 5 minutes, then place the bombs on it. Also, do not overload with greasy filling, drain if needed.
Is there a gluten free option
Use a gluten free pizza dough you trust. The texture is slightly different, but it absolutely works. Brush with extra butter and Parmesan for more flavor.
What if my dough keeps snapping back while I try to stretch it
Let it rest 5 minutes, covered. It is just the gluten saying take five. Then try again, it relaxes.
And if any of this feels fussy, remember, we are making cozy little snack moons. It is cooking, not a contract negotiation. Enjoy the process, yall.