Okay, Let’s Talk Breakfast Game Changers
You know those mornings? The ones where you *really* want something special for breakfast or brunch, but the thought of standing there dipping bread and flipping slices while everyone else sips coffee just… nope. That was me, for ages. Until I discovered the absolute magic that is Overnight Crème Brûlée French Toast. Seriously, it’s like you waved a wand the night before, and poof! Deliciousness appears.
The first time I made this, it was for Christmas morning. My family thought I’d been up since the crack of dawn, being all domestic and fancy. Little did they know, I’d done all the work while binge-watching something questionable the night before. Getting that crispy, sugary crust right out of the oven? Pure joy, I tell ya. It’s become a tradition now, and honestly, I make excuses to whip this up any time we have guests staying over. It’s *that* good, and *that* easy (the easy part is my favourite!).
Why My Crew Goes Crazy for This Stuff
Look, there are plenty of french toast recipes out there, right? But this one… oh man. It’s the whole package. You get that silky, custardy center (that’s the ‘crème brûlée’ part doing its thing) and then that shatteringly crisp, caramelly top. It’s a texture party in your mouth, seriously. Plus, the fact that you prep it ahead? Lifesaver! I make this when I know we have a lazy weekend morning planned, or when friends are crashing over. It feels dead fancy, but it’s honestly minimal effort on the day itself. And let’s be real, who doesn’t want to wake up to something that smells this heavenly? It’s probably the only thing that gets some teenagers I know outta bed before noon!
Alright, What You’ll Need (Ingredients!)
Here’s the list. Don’t get hung up on perfection here, okay? Use what you’ve got if you can!
- Bread: About a loaf’s worth. A good sturdy bread is key! Think challah, brioche, or a nice thick-cut artisan loaf. Day-old or slightly stale is actually *better* for soaking up the custard without turning to mush. If your bread is super fresh, just cube it up and leave it out on the counter for a few hours, or even pop it in a low oven (around 200°F/90°C) for 10-15 minutes to dry it out a bit.
- Eggs: 6 large ones. The backbone of your custard.
- Heavy Cream: 2 cups (around 470ml). This is where the ‘crème’ comes form. Don’t skimp!
- Milk: 1 cup (around 240ml). Whole milk is best for richness, but 2% works too if that’s all you keep.
- Granulated Sugar: 1/2 cup (about 100g), plus another 1/4 cup (about 50g) for the topping later.
- Brown Sugar: 1/4 cup (about 50g), packed. This adds lovely caramel notes to the custard.
- Vanilla Extract: 1 tablespoon. Use good quality stuff if you can, it makes a difference. I found some great tips on picking vanilla here, just sayin’.
- Cinnamon: 1 teaspoon. Just a little warmth.
- Nutmeg: 1/4 teaspoon. Freshly grated is divine, but pre-ground is totally fine.
- Salt: A tiny pinch, maybe 1/4 teaspoon. Balances all that sweetness.
- Butter: A tablespoon or two, melted, to grease the dish.
Okay, Let’s Put This Thing Together (Directions!)
This is the easy part, honestly. Do this the night before and thank yourself in the morning.
- Prep the Bread: Cut your bread into cubes, about 1-inch (2.5cm) size. Don’t fuss over perfect cubes, just get ’em roughly the same size so they cook evenly.
- Butter the Dish: Lightly butter a large baking dish. A 9×13 inch (23×33 cm) dish is usually perfect, but a slightly smaller or larger one works; it’ll just change how thick the french toast layer is.
- Layer the Bread: Spread the bread cubes evenly in the prepared dish.
- Make the Custard: In a large bowl, whisk together the eggs, heavy cream, milk, 1/2 cup granulated sugar, brown sugar, vanilla extract, cinnamon, nutmeg, and salt. Whisk it until it’s all nicely combined and the sugar is mostly dissolved. Don’t worry if it’s not perfectly smooth, a few little sugar speckles are fine.
- Pour it Over: Carefully pour the egg mixture evenly over the bread cubes in the dish. Make sure all the bread gets soaked. You might need to gently press the bread down with a spatula or your hands to help it absorb the liquid. Get it nice and saturated!
- Chill Out (Overnight!): Cover the dish tightly with plastic wrap. Pop it in the fridge for at least 4 hours, but preferably overnight (like, 8-12 hours). This is the magical bit where the bread soaks up all that custardy goodness.
The Next Morning:
- Get Ready: Take the dish out of the fridge about 20-30 minutes before you plan to bake it. This takes the chill off slightly. Preheat your oven to 350°F (175°C).
- Bake Time: Bake the french toast for about 30-40 minutes. You’re looking for it to be puffed up, set in the center, and lightly golden around the edges.
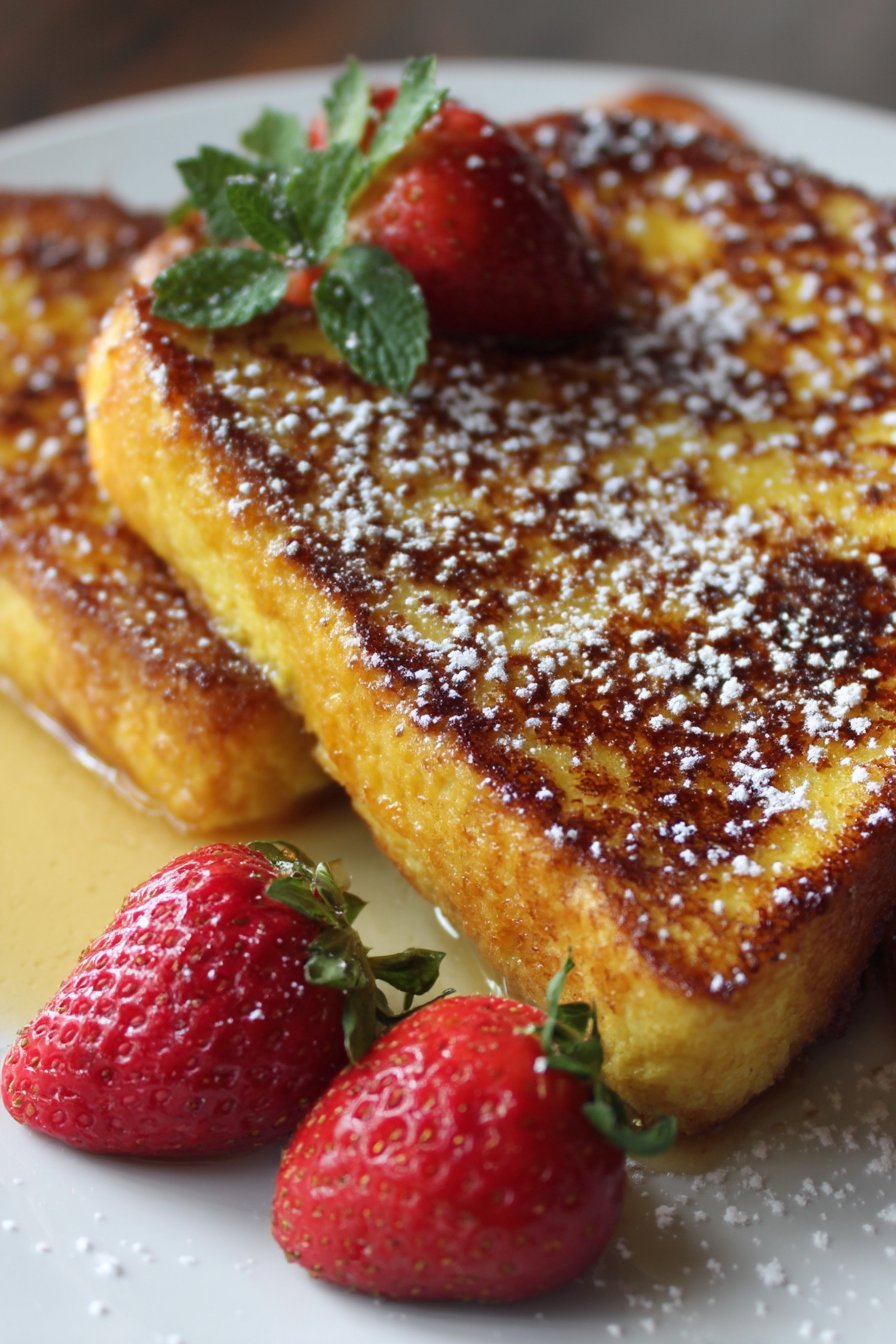
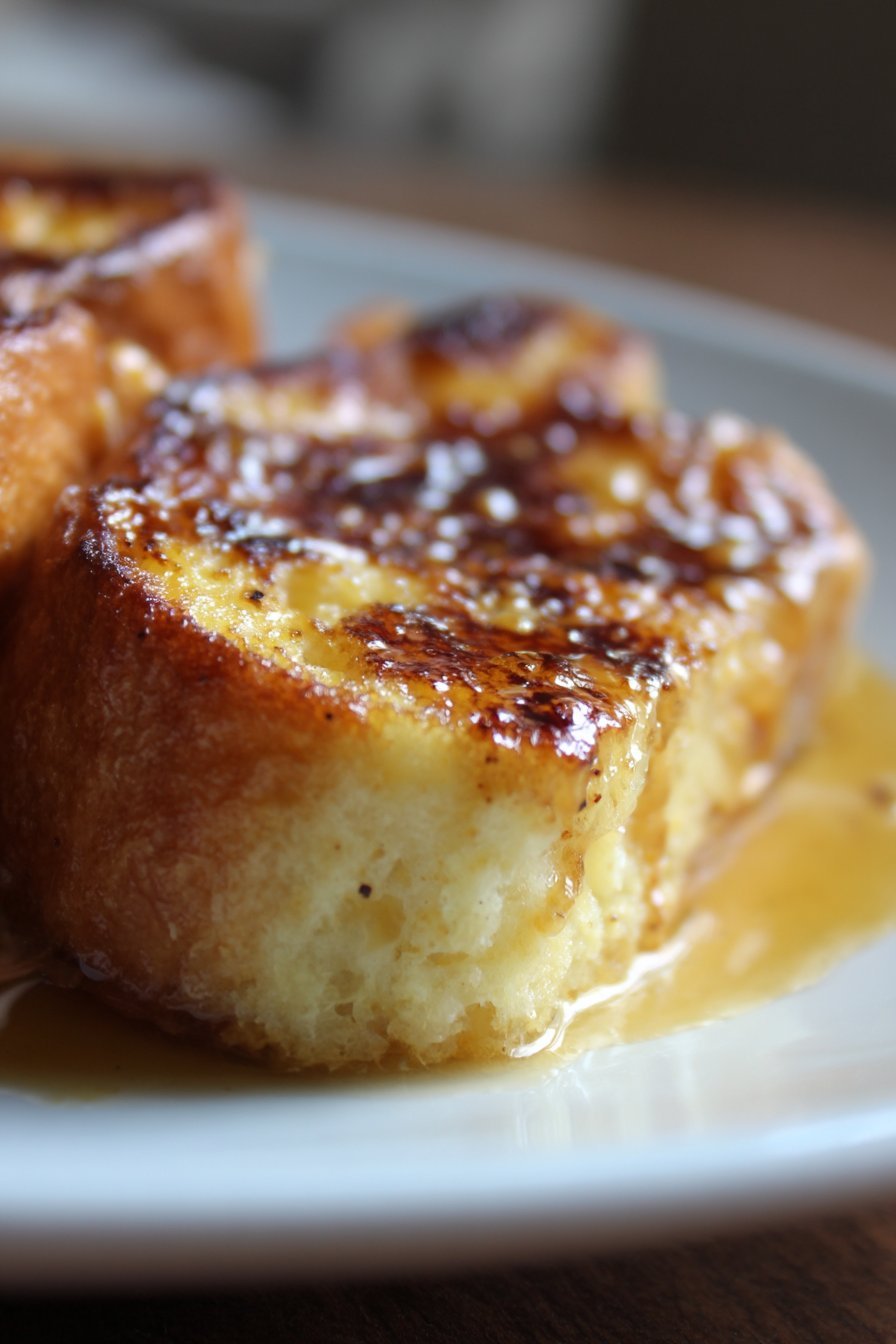
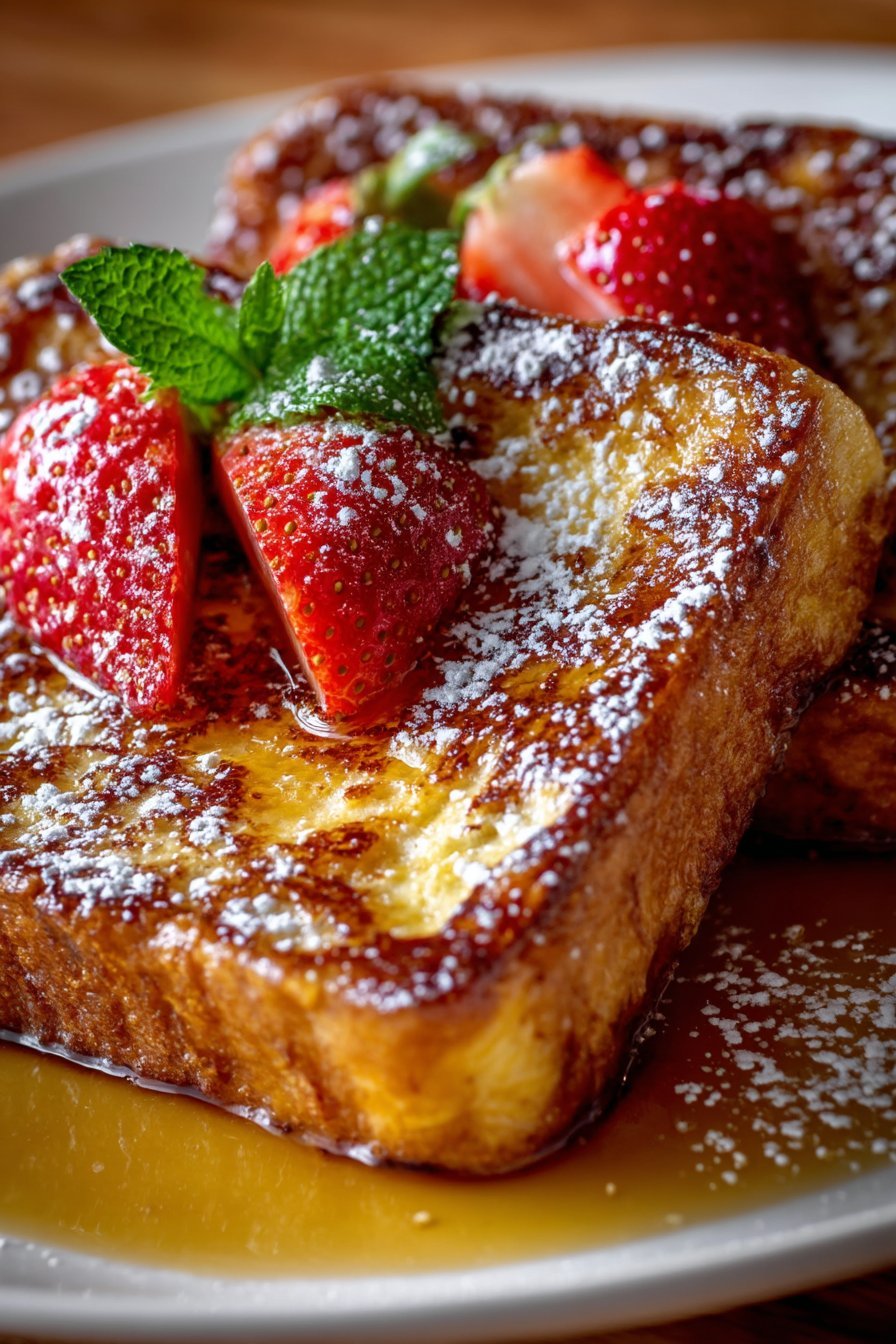
- Sugar Crust Time! This is the fun part! Once it’s baked, take it out. Evenly sprinkle the remaining 1/4 cup of granulated sugar all over the top. Now, for the brûlée! The best way is with a kitchen torch if you have one. Just wave the flame over the sugar until it melts and caramelizes into a lovely, amber crust. Be careful not to burn it! If you don’t have a torch, you *can* pop it under a preheated broiler for a minute or two. Watch it CONSTANTLY, and I mean constantly, because sugar goes form perfect to burnt coal in seconds under a broiler. It won’t be quite the same even crust as with a torch, but it’ll still be delicious and bubbly.
- Serve Hot: Let it sit for just a minute after brûléeing (careful, that sugar is hot!). Then scoop and serve!
Just a Few Things I Noticed (Notes)
- Really pressing the bread down after pouring the custard helps prevent dry spots. I learned that the hard way on my third try.
- Different breads will soak up the liquid differently. If using a really dense bread, you might need a *little* bit more milk/cream, but start with the recipe amounts.
- Don’t skip the rest period! That overnight soak is what makes it so good and prevents sogginess while ensuring the middle is creamy.
Experiments I’ve Tried (Variations!)
I like messing around in the kitchen, so naturally, I’ve tinkered with this.
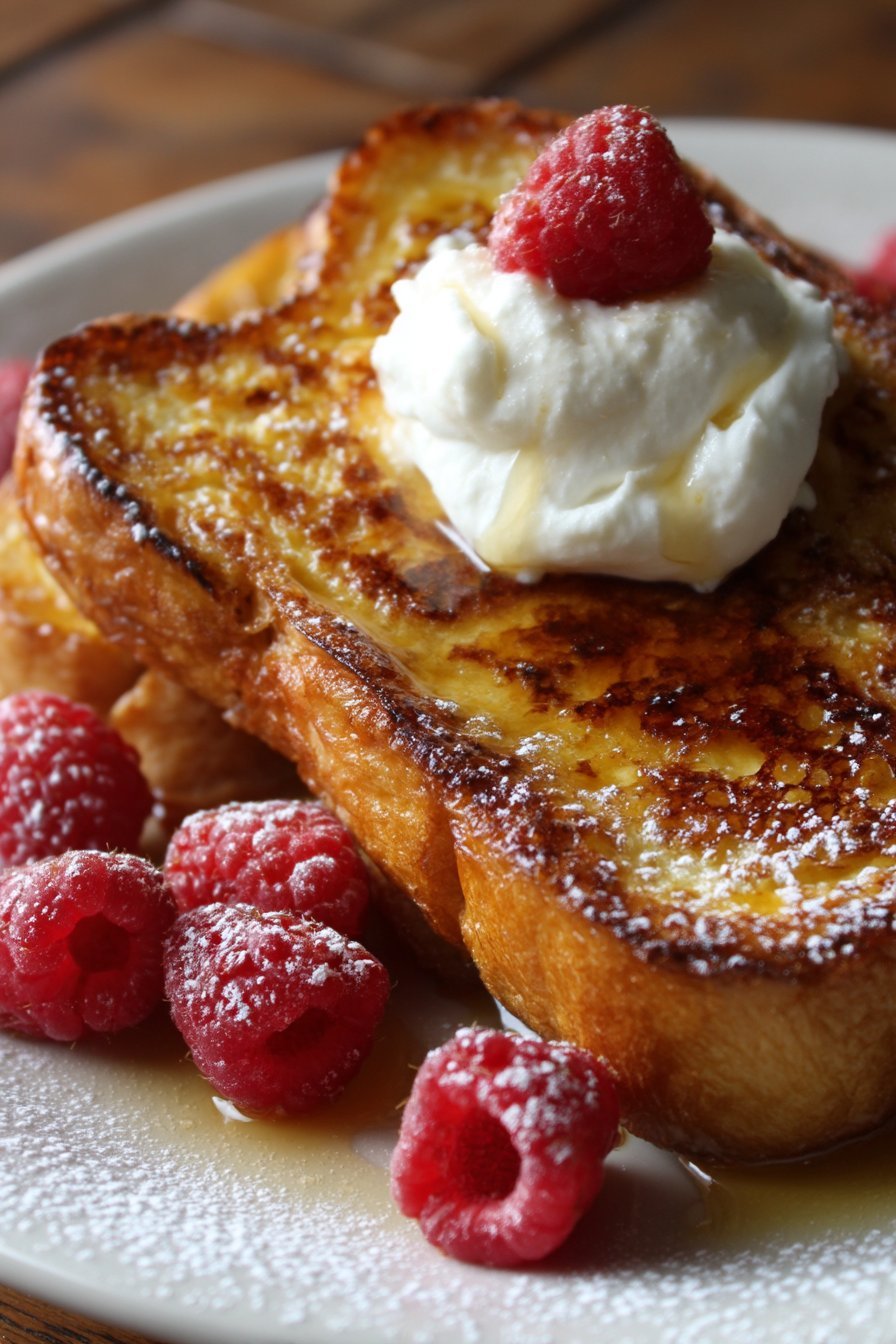
- Added Berries: Tossing a handful of fresh berries (like blueberries or raspberries) amongst the bread cubes before pouring the custard is lovely. They burst slightly and add a nice tart contrast.
- Citrus Zest: A little orange or lemon zest added to the custard gives it a bright lift. Highly recommend this!
- Chocolate Chips: Tried this once. Added dark chocolate chips. It sounded like a good idea, but they mostly just melted into the custard rather than staying as chips, making the middle a bit… muddy? Not my favorite variation, honestly. Stick to adding chocolate *after* it’s baked, maybe with some whipped cream or syrup.
Tools That Help (Equipment)
You don’t need much, honestly. A big bowl, a whisk, and a baking dish. A good sharp knife for cutting the bread is handy. And that kitchen torch for the brûlée topping is a game-changer, truly. If you don’t have one though, as I mentioned, the broiler is your friend, just be extra super careful!
Keeping It Fresh (Storage)
Okay, real talk? In my house, this rarely lasts past the first serving. But if you DO have leftovers, just cover the dish tightly with plastic wrap or transfer portions to airtight containers and keep it in the fridge. It’ll last for 2-3 days. Reheating it is best done gently in the oven or even a toaster oven to try and crisp up the top again, though honestly, that fresh-brûléed crisp is hard to beat.
How I Like to Serve It
Warm, right out of the oven, obviously! A little dusting of powdered sugar is pretty, but totally optional because you’ve already got that amazing crust. My family tradition is a drizzle of maple syrup (the *real* stuff, please!) and a dollop of whipped cream or even some vanilla ice cream if we’re feeling particularly decadent. Fresh berries on the side are also a must for a bit of freshness against the richness.
Quick Lessons from My Mistakes (Pro Tips)
- Bread Choice Matters: Using soft sandwich bread is a rookie error I made early on. It turns to total mush. Get that sturdy, slightly dry stuff.
- Don’t Skip the Soak: Seriously, that overnight chill time isn’t just for convenience. It allows the bread to fully absorb the custard evenly. Rushing it means a less creamy center and potentially dry patches. I tried making it after only 2 hours once, and it just wasn’t the same.
- Watch the Broiler: If using the broiler for the topping, do not walk away! Stand there and watch it. It takes seconds to go from perfect caramel to burnt sugar, and that is NOT a fun smell to get out of your kitchen.
Stuff People Ask Me (FAQ!)
Q: Can I make this ahead and bake it right before serving?
A: YES! That’s the beauty of it! Prep everything, pour the custard, cover, and pop it in the fridge overnight. Pull it out maybe 20-30 mins before baking to take the extreme chill off, then bake as directed. Brûlée just before serving!
Q: What kind of bread is best, really?
A: My absolute favorite is challah or brioche, they have a nice richness and soak beautifully. A good french bread or sourdough also works. Anything that isn’t super soft like standard sliced bread. Stale is your friend here.
Q: Can I use milk instead of cream? It’s lighter, right?
A: You *can*, but it really won’t have that rich, custardy ‘crème’ texture that makes this dish special. It’ll be… fine, more like regular french toast casserole. For the true crème brûlée experience, you really need the heavy cream. Maybe compromise and use half-and-half if you must?
Q: What if I don’t have brown sugar?
A: You can use all granulated sugar in the custard, but you’ll lose some of that lovely, deep caramel flavor. It’s not the end of the world, but the brown sugar adds a nice touch.
Q: My sugar didn’t caramelize properly with the broiler! Help!
A: Yeah, that can happen, the broiler is tricky! Make sure the rack is pretty close to the heating element, and keep your eye on it the whole time. It helps if the sugar is in an even layer. Honestly, a kitchen torch is worth the small investment if you plan on making this often, it makes the brûlée perfect every time! But hey, even without a perfect crust, it still tastes amazing.
So there you have it! Go forth and make some breakfast magic. Your tastebuds (and your lazy morning self) will thank you.