Alright, Y’all, Let’s Talk Smoked Pork Chops!
Okay, confession time. For years, I was scared of smoking anything more complicated than a sausage. Like, genuinely intimidated. But then I tried these smoked pork chops on a whim one sunny Saturday afternoon (I think it was after a particularly frustrating attempt at baking sourdough, don’t even ask). And holy cow, friends, they were a revelation! So simple, but *bursting* with flavor. It felt like I unlocked some sort of backyard BBQ cheat code. My neighbor, old Mr. Henderson, who usually just nods politely at my cooking attempts, actually came over and asked for the recipe! That’s when you know you’ve hit gold, right?
Why I’m Totally Head Over Heels for This Recipe
Seriously though, why do I keep coming back to this? Well, form one, it’s surprisingly hands-off once they’re on the smoker. You do a little prep, put ’em on, and then you can just… hang out? Drink a cold one? Read a book? (Though I usually just hover anxiously, because that’s me). Also, my kids, who can be *super* picky sometimes (don’t tell them I said that!), absolutely demolish these. Like, silence at the dinner table kind of demolishing. That alone is a victory, let’s be honest. Plus, they don’t dry out easily, which was always my fear with pork chops.
Gather Your Goodies (Ingredients!)
Here’s what you’ll need to get these bad boys smoking:
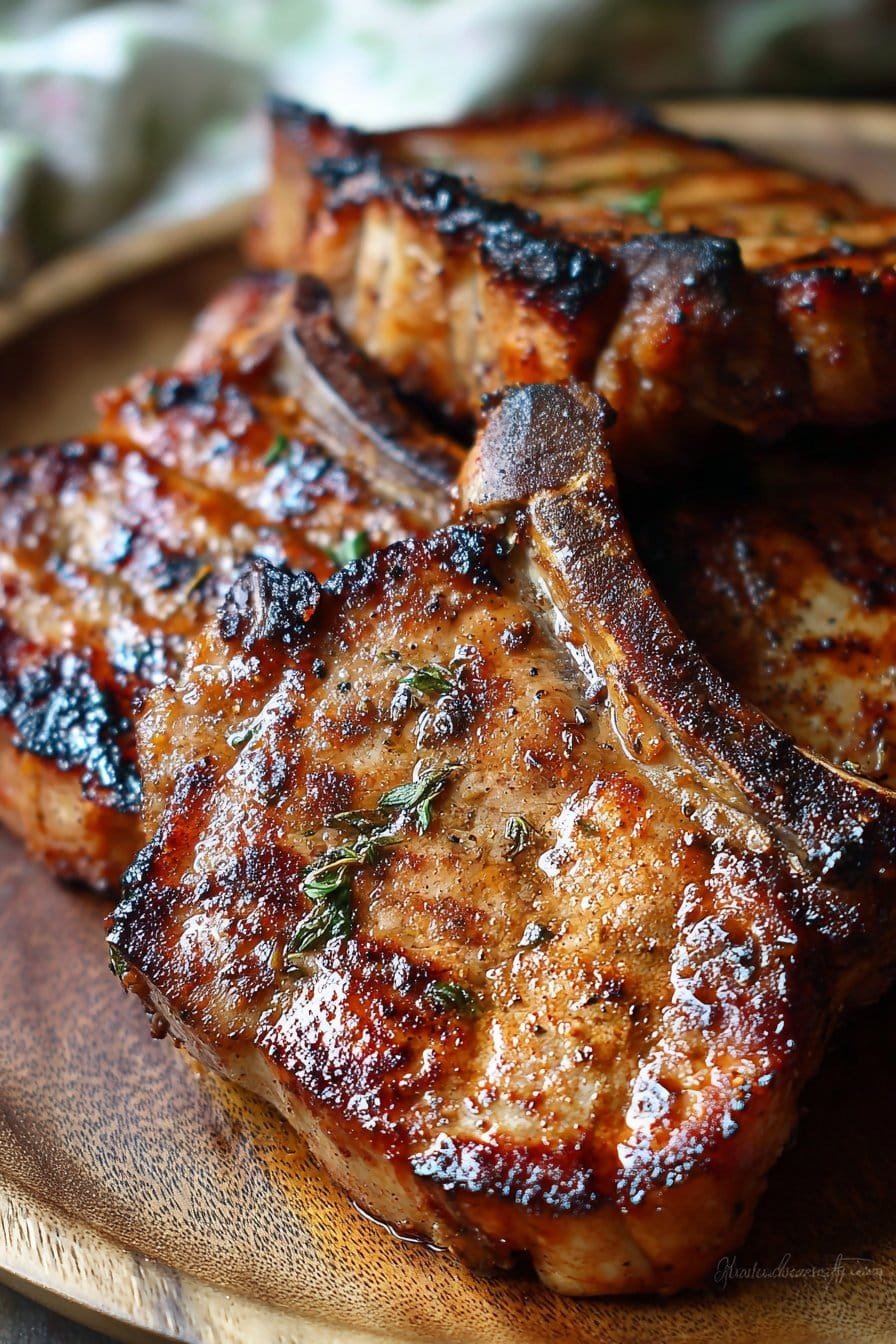
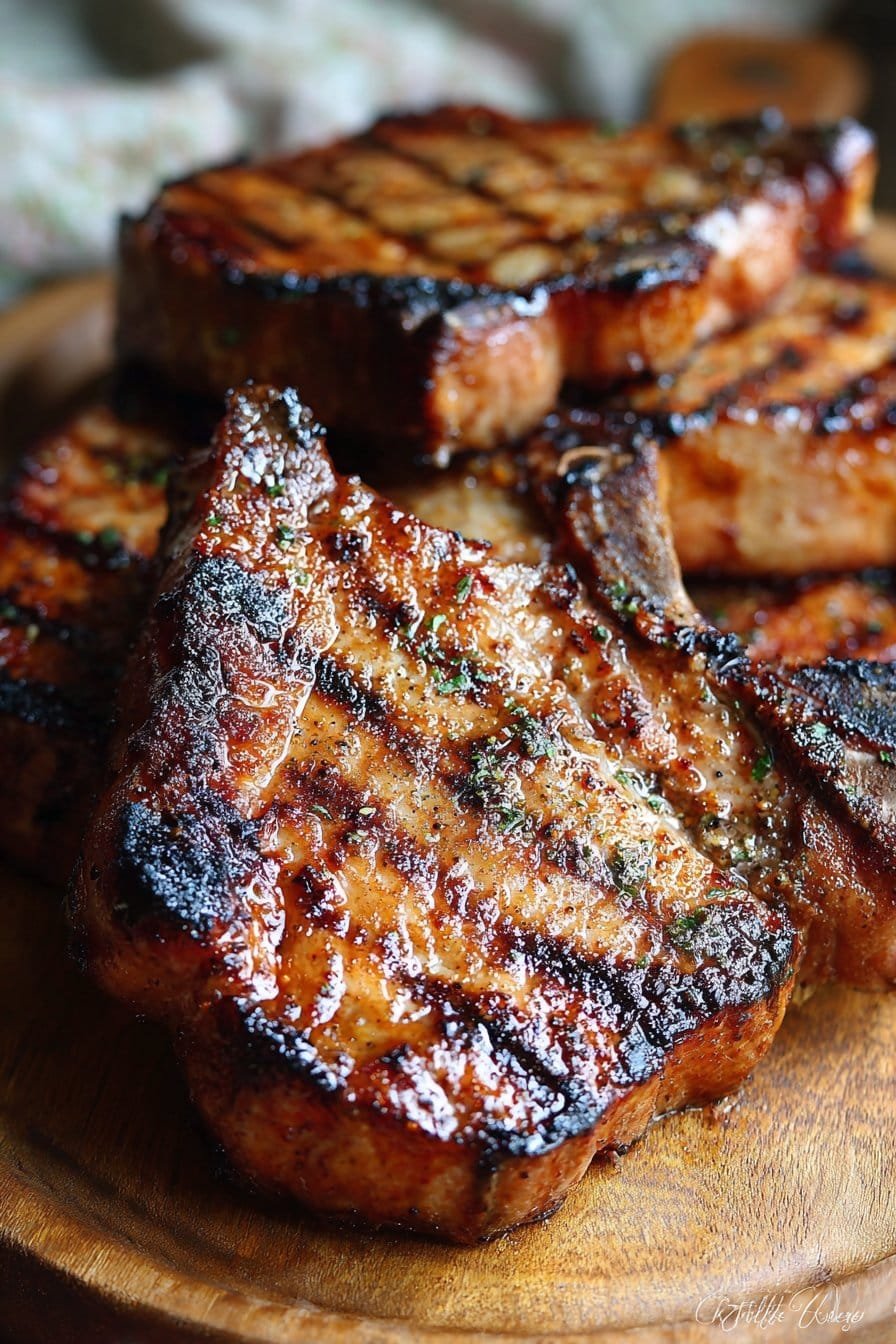
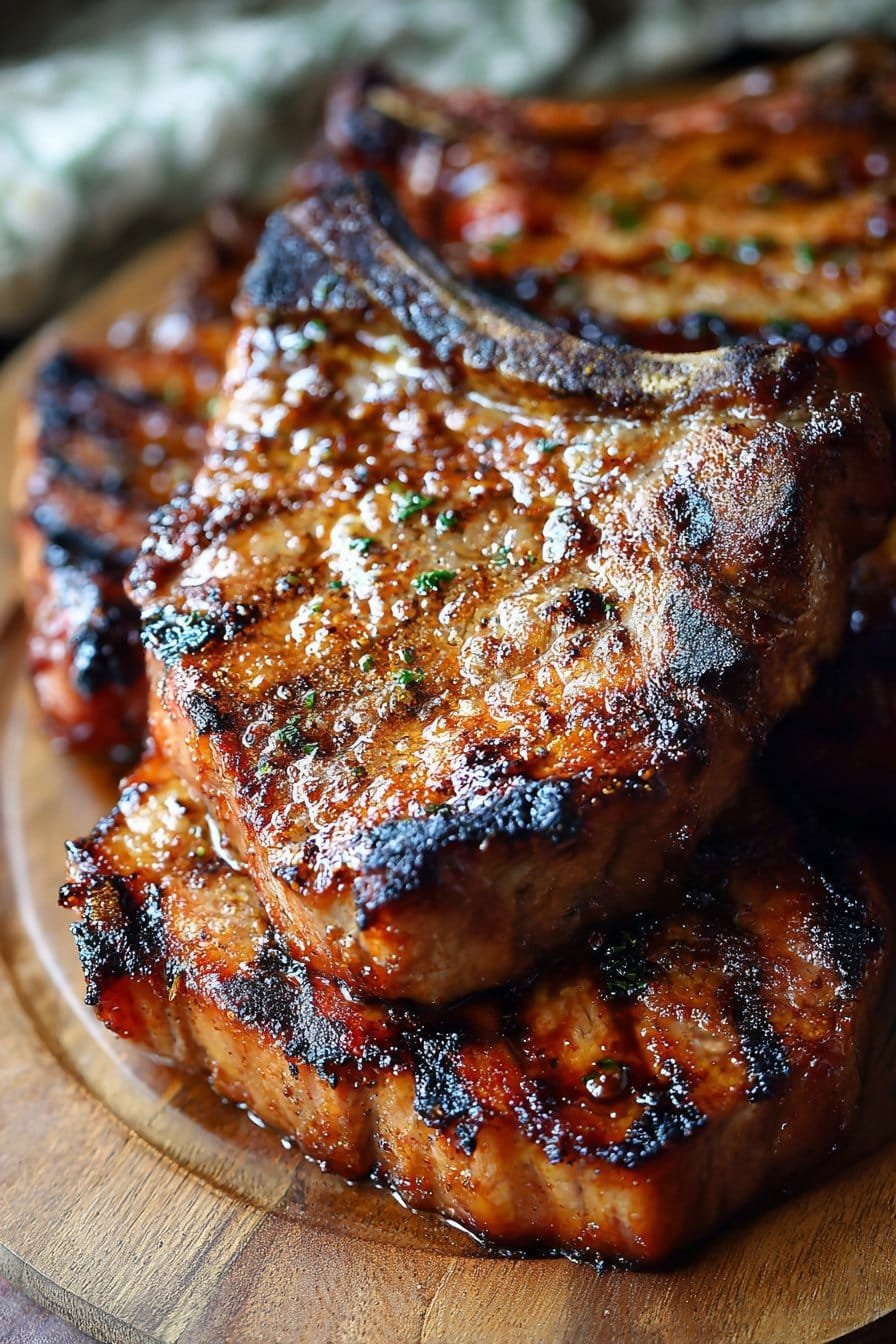
- 4-6 Thick-cut bone-in pork chops (about 1 inch thick or a smidge more is perfect. Thinner ones cook way too fast on the smoker and can get dry, trust me on this.)
- Olive oil or melted butter (just a drizzle to help the rub stick)
- About 2-3 tablespoons of your favorite pork or all-purpose BBQ rub. (I’m a big fan of Meathead’s Memphis Dust, but honestly, use whatever you have kicking around! Sometimes I’ll even just use salt, pepper, garlic powder, and a pinch of paprika if I’m feeling lazy).
- Wood chips or chunks for smoking (Hickory or Applewood are classic for pork, but Pecan is lovely too! Or mix ’em!)
Let’s Get Smokin’ (The How-To)
Okay, deep breath! It’s easy.
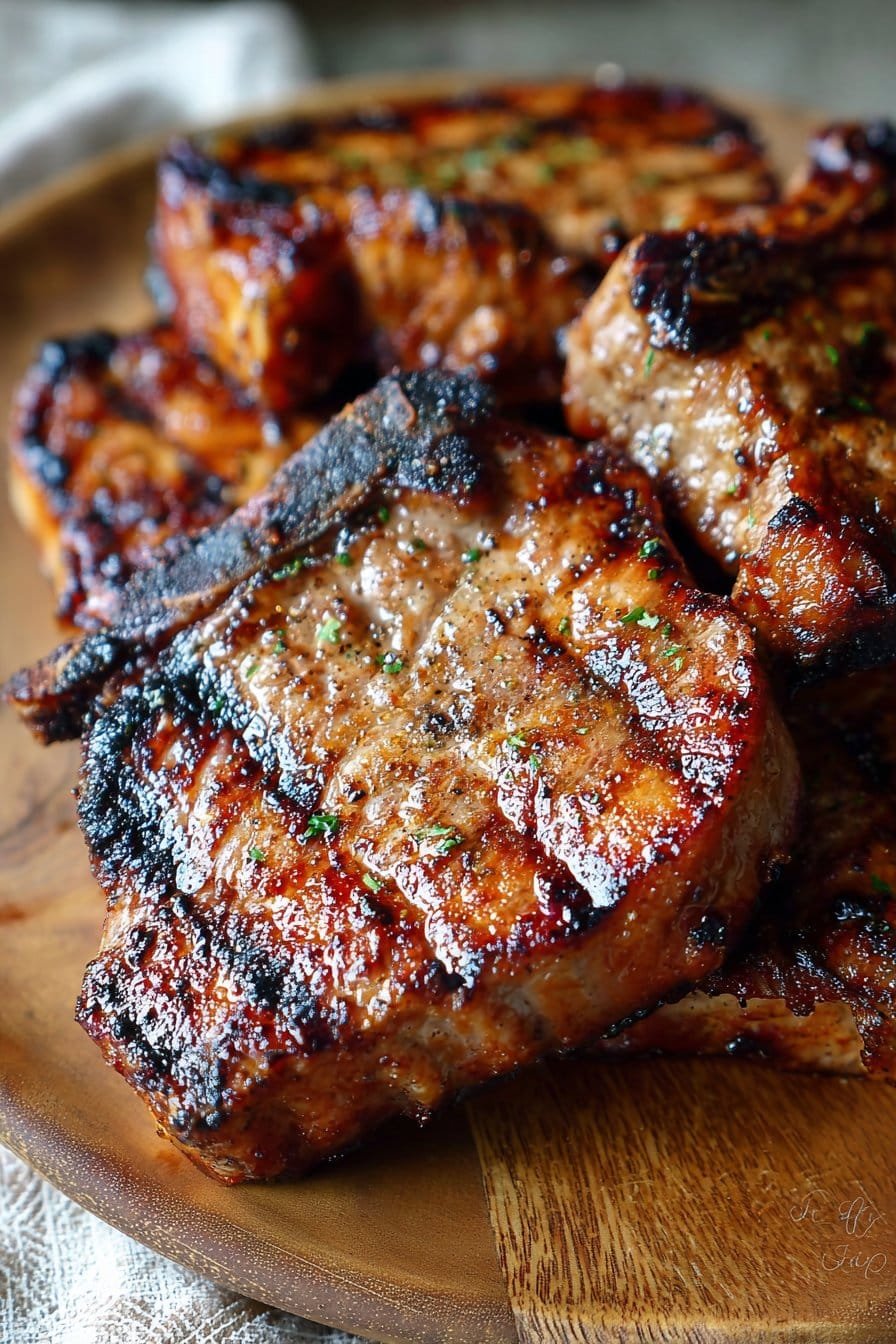
- Pat those pork chops *really* dry with paper towels. This is super important for getting a good bark (that lovely crust!).
- Give ’em a light drizzle of olive oil or brush with melted butter. This is just the glue for your rub.
- Sprinkle that rub all over the chops, pressing it in gently. Don’t be shy, get the sides too! This is where all that flavor comes from, you know? Let them sit for 15-30 minutes at room temperature while you get your smoker ready.
- Get your smoker heated up to around 225°F to 250°F (107°C to 120°C). This low and slow temperature is the key to getting that beautiful smoky flavor without drying out the meat. Add your wood chips or chunks according to your smoker’s instructions.
- Place the pork chops directly on the grates. Try not to let them touch, air flow is your friend here.
- Now, shut the lid and walk away! Well, for a bit anyway. You’re going to smoke them for maybe 1 to 2 hours. The *real* test isn’t time, it’s temperature.
- Start checking the internal temperature with a good meat thermometer after about an hour. You’re looking for an internal temp of 140°F (60°C). This is where I usually sneak a taste of something else I’m cooking, because… well, why not?
- Once they hit 140°F, you can either leave them on the smoker until they reach 145°F (63°C) which is considered done and safe, or you can sear them quickly over high heat to get a nicer crust. I tend to pull mine at 140°F and then sear them for 1-2 minutes per side over screaming hot coals or a hot pan. That little sear just makes them look and taste even better, I think.
- Let the chops rest for 5-10 minutes *before* slicing. This is crucial for keeping all those juices inside. If you cut too soon, all that lovely moisture runs out onto the cutting board, and nobody wants dry pork!
Things I Learned the Hard Way (Notes)
- Getting the smoker temperature stable is half the battle. It takes practice! Don’t beat yourself up if it bounces around a bit.
- Investing in a good instant-read thermometer is a total game changer. Seriously, stop guessing if your meat is done!
- Don’t overcrowd your smoker. Bad air flow means less even cooking and less smoke flavor.
Trying New Things (Variations I’ve Played With)
I’ve messed around with this recipe a bit. I tried brining them once before smoking, and honestly, it didn’t make enough difference for the extra step. So I usually skip that now. But I *do* sometimes finish them with a light brush of BBQ sauce in the last 15 minutes on the smoker – adds a nice sticky glaze! Experiment with different rubs and wood types too; it really changes the flavor profile.
Stuff You Might Need (Equipment)
Obviously, you need a smoker (charcoal, pellet, electric, whatever you’ve got!). A good meat thermometer is non negotiable, really. Tongs are helpful. If you don’t have a dedicated searing station or grill for the final sear, a cast iron pan on your stove works perfectly fine!
Keeping ‘Em Fresh (Storage)
Leftovers? What leftovers?! Haha. Okay, *if* you happen to have any (which is highly unlikely in my house, they disappear fast!), store them in an airtight container in the fridge for 3-4 days. They’re actually pretty good cold, or gently reheated.
What to Serve With ‘Em
Oh man, the possibilities! Creamy mac and cheese is a classic. Coleslaw, potato salad, grilled corn… or honestly, just a simple green salad works beautifully because the chops are the star! My family always insists on some good ol’ southern green beans alongside.
Words to the Wise (Pro Tips form My Mistakes)
- Don’t smoke at too high a temp initially. You’ll cook the outside before the smoke has a chance to penetrate, and you won’t get that lovely smoky flavor. I once tried rushing this and regretted it big time.
- Always rest your meat! Seriously, I know I said it before, but it’s worth repeating. It makes *such* a difference in juiciness.
- Use good quality, thick chops. Skinny ones are a recipe for dry disappointment on a smoker.
Burning Questions Answered (FAQ)
Q: Can I use boneless pork chops?
A: You *can*, but bone-in chops tend to stay juicier. If you use boneless, definitely go for thick ones and watch the temp *really* closely! They’ll cook faster.
Q: My smoker temperature is hard to control, what do I do?
A: Yep, totally been there! It takes practice. Try using less fuel, adjusting vents slowly, and don’t open the lid too often! Every time you peek, you lose heat and smoke. Patience is key!
Q: How do I get more smoke flavor?
A: Make sure you have clean smoke (thin blue smoke, not thick white stuff!). Use enough wood, and make sure your meat is dry so the smoke can stick. Smoking at a slightly lower temp for longer helps too, up to a point.
Q: What if I don’t have a smoker? Can I fake it?
A: Hmm, it won’t be the same, but you could try cooking them mostly in an oven at a low temp (say, 275°F or 135°C) and then searing them really well in a hot pan or grill. You won’t get the smoke, but you can still get a juicy chop! Maybe add a pinch of smoked paprika to your rub?
So there you have it! Go forth and smoke some pork chops, friends. You got this!
Ingredients
- 4 bone-in pork chops, about 1 inch thick
- 2 tbsp brown sugar
- 1 tbsp smoked paprika
- 1 tsp garlic powder
- 1 tsp onion powder
- 1 tsp black pepper
- 1/2 tsp cayenne pepper (optional)
- Salt to taste
- Wood chips (hickory, apple, or cherry)
Instructions
-
1Pat the pork chops dry with paper towels. This helps the rub adhere and promotes better browning.
-
2In a small bowl, combine the brown sugar, smoked paprika, garlic powder, onion powder, black pepper, cayenne pepper (if using), and salt to create the rub.
-
3Generously apply the rub to all sides of the pork chops, pressing it gently to make sure it sticks.
-
4Preheat your smoker to a temperature of 225-250°F (107-121°C). Add your preferred wood chips according to your smoker’s instructions.
-
5Place the pork chops directly on the smoker grates. Smoke for 1 to 1.5 hours, or until the internal temperature of the thickest part of the chops reaches 145°F (63°C) using a meat thermometer.
-
6Remove the pork chops from the smoker and let them rest for 5-10 minutes before serving. This allows the juices to redistribute, resulting in a more tender chop.
Approximate Information for One Serving
Nutrition Disclaimers
Number of total servings shown is approximate. Actual number of servings will depend on your preferred portion sizes.
Nutritional values shown are general guidelines and reflect information for 1 serving using the ingredients listed, not including any optional ingredients. Actual macros may vary slightly depending on specific brands and types of ingredients used.
To determine the weight of one serving, prepare the recipe as instructed. Weigh the finished recipe, then divide the weight of the finished recipe (not including the weight of the container the food is in) by the desired number of servings. Result will be the weight of one serving.
Did you make this recipe?
Please consider Pinning it!!