When This Pie Shows Up, People Just… Smile
You know how there are some desserts that just turn a regular Tuesday into something special? That’s what this chocolate peanut butter pie does for me. Actually, the first time I made it was after a countertop disaster involving a springform pan and, well, too much enthusiasm (let’s just say—peanut butter on the dog, chocolate on the floor,, you get the idea). But honestly, even with all that chaos, everyone loved it and nobody cared about the wonky shape. That’s how you know it’s a crowd-pleaser, right?
Why I Keep Making This Pie (and Maybe You Will Too)
I make this when I want everyone to hush and eat, which might sound harsh but if you’ve been at one of my family dinners you know what I mean! My family goes wild for the combo—my brother once described it as the love child of a Reese’s Cup and a cloud (only he would say it like that). I used to dread making crusts, but this one’s basically foolproof—even if you just smash the cookies up in a zip-bag with a rolling pin (not going to lie, I’ve used a wine bottle in a pinch).
Also, the biggest win: there’s zero oven time (other than the crust, and sometimes I skip that, and it still works). No hot kitchen, no stress, and you get to lick the beaters, which is half the fun for me.
So, What Goes In This Thing? (Ingredients)
- 1 1/4 cups chocolate cookie crumbs (like Oreos, Graham crackers if that’s what’s in the pantry, or honestly, any crunchy cookie you like)
- 4 tbsp unsalted butter, melted (sometimes I cheat with salted, just use a smidge less salt later)
- 1 cup creamy peanut butter (natural is fine but I usually grab what’s cheapest—I won’t tell if you don’t)
- 8 ounces cream cheese, softened (my grandma swears by Philadelphia, but store-brand is honestly fine)
- 1 cup powdered sugar (I’ve used less, for a less-sweet vibe, especially if serving kiddos)
- 1 cup heavy cream, cold (I once used tub whipped topping out of desperation… wasn’t bad but a little too light; I’d recommend real cream if you can)
- 4 ounces semi-sweet chocolate, chopped, for topping (if you only have chocolate chips, throw ’em on, who cares)
- Optional: a handful of roasted peanuts or a drizzle of caramel if you’re feeling fancy. I rarely am.
How To Make It (Mostly Without Breaking a Sweat)
- Get your crust sorted: Mix your cookie crumbs and melted butter in a bowl (with clean hands, because that’s half the fun). Press this into your pie pan or, if you’re like me and keep losing pie pans, whatever dish fits. If you’re feeling patient, bake it at 350°F for 8 minutes, but I’ve also chilled it for 30 min—works fine.
- Whip up the filling: In a big bowl, beat together peanut butter, cream cheese, and powdered sugar. Use an electric mixer if you have one. If not, elbow grease and a wooden spoon work—it just may take longer, and you might grumble.
- Cream time: In another bowl, whip the cream until it looks like fluffy clouds (soft peaks). This is where I usually sneak a taste because why not?
- Get it all together: Fold the whipped cream gently into the peanut butter mix. Be patient—it might look a bit messy at first, but it always comes together. This isn’t the time to show off your speed skills.
- Pack the pie: Plonk the filling onto your crust. Smooth it out. Lick the spatula (highly recommended).
- Chill out: Stick it in the fridge for at least 4 hours. Overnight is even better. I think the flavors get cozier with time.
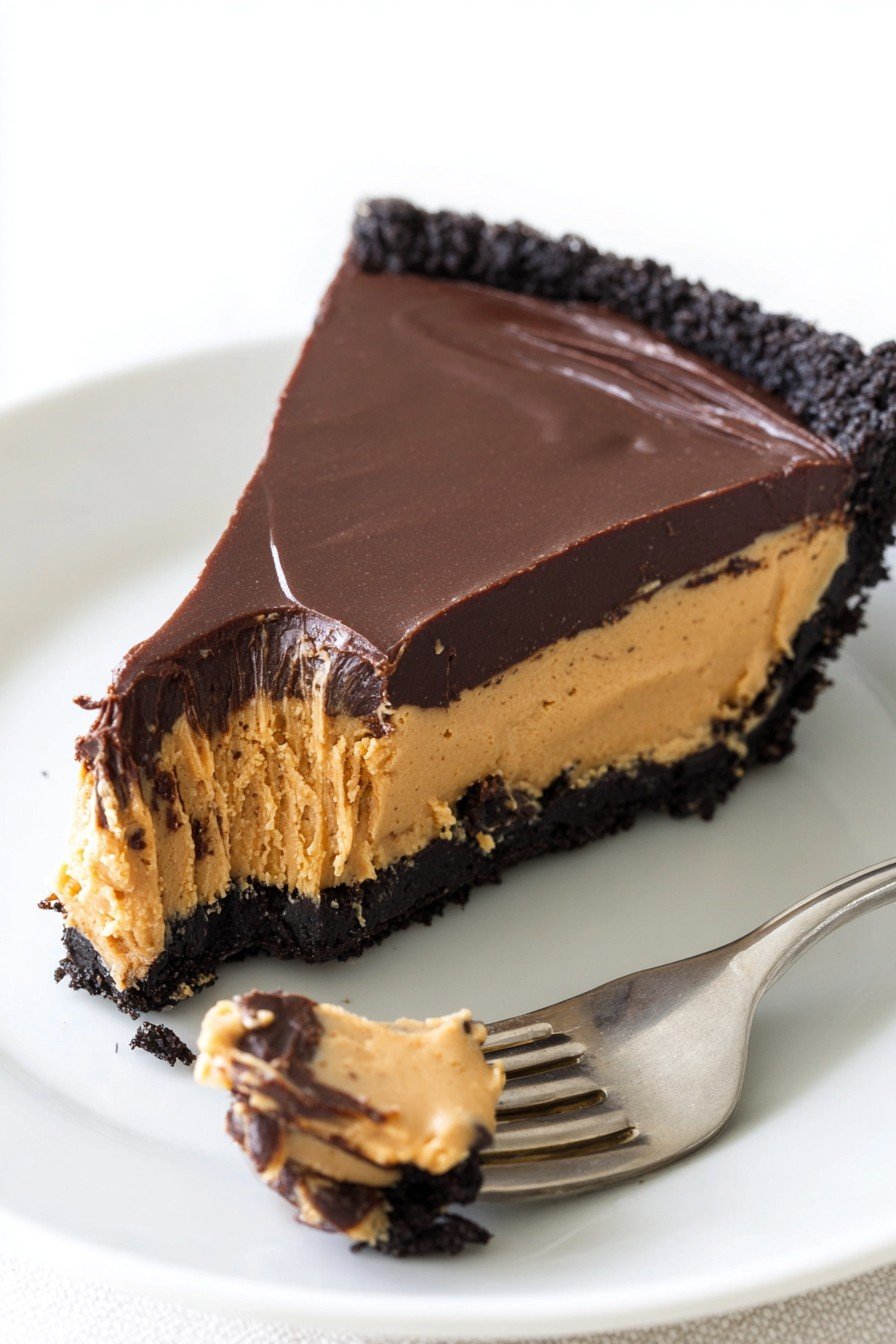
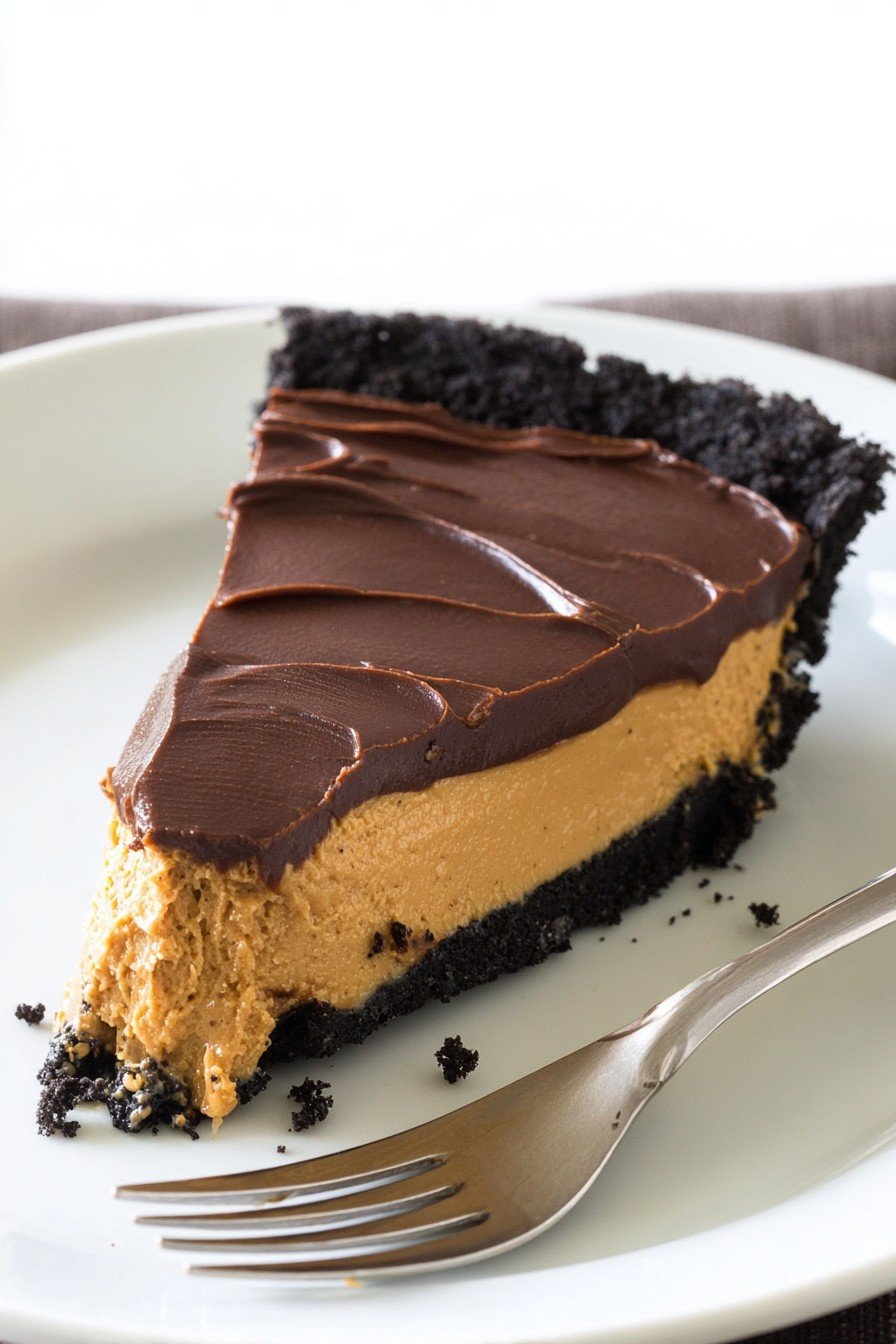
- Top it off: Sprinkle chocolate chunks or chips on top, or go rogue and melt some to drizzle over. If you’re in a hurry, just slap it on as-is and call it rustic.
A Bunch of Notes—Some Useful, Some Just Rambly
- If your crust seems too dry, just add a splash more butter. If it’s too wet, toss in more crumbs. Simple as that.
- That whipped cream step? Don’t overwhip! I did once and ended up with basically butter. (Tasted fine but texturally… yikes.)
- Tried making mini pies in muffin tins once—total chaos—in theory cute, but in reality, sticky disaster.
- I’ve used crunchy peanut butter once—personally not a fan, but someone else might love the crunch.
When I Felt Adventurous: Pie Variations
- Added a layer of sliced bananas before the filling. Tasted great. Looked weird.
- Bittersweet chocolate chips as topping instead of semi-sweet. A little grown-up, but my nephew spat it out, so maybe not for kids?
- Once tried a gluten-free ginger snap crust. Nope. Not my best move—too strong.
- For an even lazier version, used store-bought graham pie crust and nobody complained (as far as I know).
What You’ll Need (And How to Improvise)
- 9-inch pie pan (or really, whatever you have—a cake tin works in a pinch, and one time I used a casserole dish. Pie’s a state of mind, honestly.)
- Mixing bowls—at least two, unless you like washing as you go (I don’t)
- Electric mixer, hand mixer, or a good arm workout
- Spatula (or a big spoon)
- Ziploc bag + rolling pin (or a wine bottle, or your shoe) for smashing cookies

How Long Will It Keep? (Not That It Ever Does)
Theoretically, covered in the fridge, it’ll stay good for up to 4 days. But honestly, in my house one day is the record; somebody always sneaks a piece when I’m not looking. Freezes well too, but I only figured that out after forgetting a slice at the back of the freezer for two months—actually still tasty when thawed (shocker!).
Serving Time! This Is Where I Get Excited
I like to serve it straight from the fridge, ice-cold with a bit of whipped cream on top—sometimes even a sprinkle of sea salt, if I’m feeling a little chef-y. During family gatherings, my uncle always insists on a scoop of vanilla ice cream alongside, which is basically gilding the lily but who am I to judge?
What I’ve Learned (Mostly the Hard Way)
- I once tried to shortcut the chilling step. Don’t. The filling just slid everywhere, and it was like peanut butter Jell-O. Wait the full few hours—it’s worth it.
- Don’t use warm butter for the crust, it’ll get greasy and weird; cool it a tad.
- If you forget to soften the cream cheese (happens to me every other time), 10 seconds in the microwave helps, but watch it closely or you’ll get weird chunks.
Pie Chat: Questions People Actually Asked Me
- Can I make this ahead? Absolutely! It’s even better the next day. Just cover it, stick it in the fridge, and forget about it (if you can).
- Is it crazy sweet? It’s pretty rich, so small slices are good. If you’re not a sweet tooth, go light on the sugar—or drizzle with black coffee, which is what a friend of mine does. Actually works.
- Can I freeze leftovers? Yup! Wrap individual slices in plastic, toss ’em in a freezer bag. Defrost in the fridge. Textures’ still nice.
- I don’t have a mixer, can I do it by hand? You can, but your arms might hate you. Just mix real well, and the filling might be a tad denser but it’ll still taste awesome.
- What if I’m allergic to peanuts? First, don’t make this, but if you’re just not a fan, almond or cashew butter works (though it’s a bit pricier and, on second thought, you might as well try a different pie, like no-bake cheesecake).
- Where can I find more like this? I love The Kitchn’s list of no-bake pies. Lots of glorious options I mean, you’ll lose an afternoon there.
And that’s it! If you give this chocolate peanut butter pie a try, let me know if you run into any disasters or strokes of genius. Or, you know, if your dog ends up with chocolate on his ear like mine did once—what a time.
Ingredients
- 1 1/2 cups chocolate cookie crumbs
- 1/3 cup unsalted butter, melted
- 1 cup creamy peanut butter
- 225g cream cheese, softened
- 3/4 cup powdered sugar
- 1 1/4 cups heavy cream, divided
- 1 cup semisweet chocolate chips
- 1 teaspoon vanilla extract
- Pinch of salt
Instructions
-
1Combine chocolate cookie crumbs and melted butter in a bowl. Mix until well combined and press into the bottom and sides of a 9-inch pie dish. Refrigerate while preparing the filling.
-
2In a large bowl, beat together peanut butter, softened cream cheese, and powdered sugar until smooth and creamy.
-
3In a separate bowl, whip 1 cup of heavy cream with the vanilla extract until stiff peaks form. Gently fold the whipped cream into the peanut butter mixture until fully combined.
-
4Spread the peanut butter filling into the chilled crust and smooth the top. Refrigerate for at least 1 hour.
-
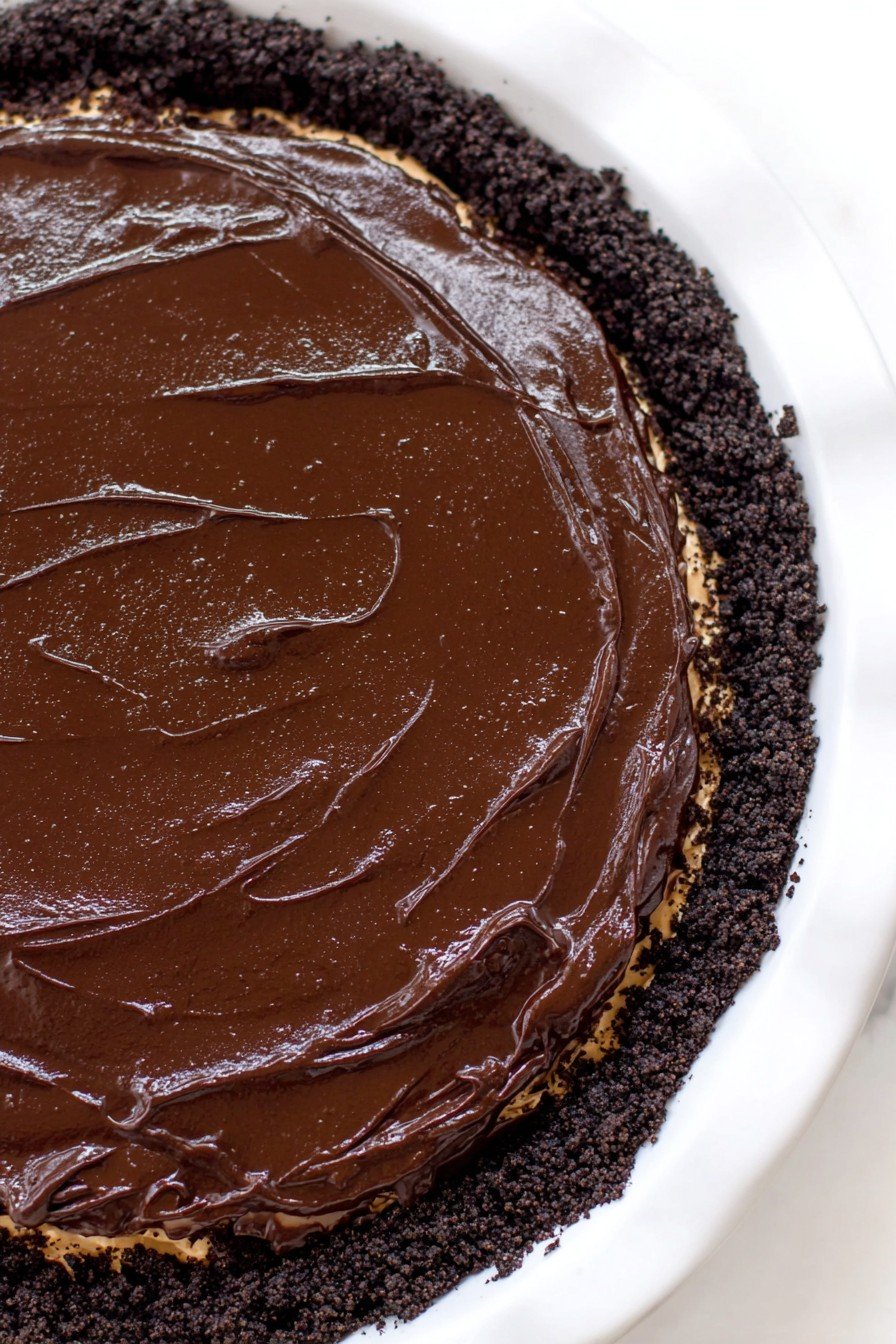
5For the ganache topping, heat the remaining 1/4 cup heavy cream until just simmering. Pour over chocolate chips, let sit for 2 minutes, then stir until smooth. Pour the ganache over the chilled filling and spread evenly.
-
6Chill the pie for another 2 hours or until firm. Slice and serve chilled.
Approximate Information for One Serving
Nutrition Disclaimers
Number of total servings shown is approximate. Actual number of servings will depend on your preferred portion sizes.
Nutritional values shown are general guidelines and reflect information for 1 serving using the ingredients listed, not including any optional ingredients. Actual macros may vary slightly depending on specific brands and types of ingredients used.
To determine the weight of one serving, prepare the recipe as instructed. Weigh the finished recipe, then divide the weight of the finished recipe (not including the weight of the container the food is in) by the desired number of servings. Result will be the weight of one serving.
Did you make this recipe?
Please consider Pinning it!!