Okay, So Let’s Talk Brownies…
Hey there! You know, sometimes you just need a brownie. Not a little wimpy one, nope. You need a *proper* brownie. Something that feels substantial, maybe a little bit over the top? That’s where these ‘Made-Over Deep Dish Brownies’ come in. My kiddo calls them ‘chocolate bricks of happiness,’ which is pretty spot on if I’m being honest. I first stumbled onto the idea for these when I was trying to replicate this ridiculously thick brownie I had at a little cafe downtown, only I wanted to make it *easier* and, well, maybe a tiny bit healthierish? It took a few tries, involving some questionable burnt edges and one attempt that was more like a sad chocolate cake, but I finally landed on this version. It’s become a go-to, especially when I’m feeling lazy but crave something utterly decadent. My secret? Starting with a good quality boxed mix. Don’t @ me, it’s a *made-over* recipe, remember? We’re enhancing, not building from scratch every single time! And trust me, no one will ever guess.
Why I Keep Making These (And You Should Too!)
Seriously, these are my comfort food. I make this when I’ve had a long day or when friends are coming over last minute because they’re *so* easy, like ridiculously easy. My family goes crazy for this because they’re just *so* fudgy and thick. Like, proper deep dish goodness. (None of that thin, crispy nonsense.) Plus, you can totally mess around with them (more on that later!). It’s a forgiving recipe, which is key for me because, let’s face it, sometimes I forget things or measure a little… optimistically? Yeah, you know the drill.
Gather ‘Round, Here Are the Bits You Need
Okay, ingredient time! Nothing too fancy pants, mostly stuff you probably have lurking in your pantry.
- 1 box (around 18 oz or 510g) family size brownie mix (whatever brand you like! I usually grab whichever is on sale, but honestly Betty Crocker works great)
- The stuff the box mix tells you to add (usually eggs, oil, and water). Pay attention to the *fudgy* brownie instructions if it gives you options!
- 1/2 cup (1 stick or 113g) unsalted butter, melted
- 1 cup (170g) semi-sweet chocolate chips, divided (or a mix! Dark chocolate chips are *divine* here)
- 1/2 cup (60g) all purpose flour (yep, we’re adding a little extra structure!)
- 1/4 cup (25g) unsweetened cocoa powder
- 1/2 teaspoon baking powder
- 1/4 teaspoon salt (even if the mix has it, a little extra boosts the chocolate flavor)
- Optional: A handful of chopped nuts (pecans or walnuts are classic), another handful of maybe peanut butter chips, or even some caramel bits! Get creative.
Side note on the butter: You could use oil like the box says, but melted butter adds a richness that’s just… *chef’s kiss*. Try it! It makes a difference, I think. And for the chocolate chips, I sometimes use chopped up chocolate bars instead of chips when I’m feeling fancy (or just out of chips!).

Let’s Get Baking! The How-To
Right then, let’s get these beauties in the oven. It’s super straightforward, promise!
- Get your pan ready: Preheat your oven to 325°F (160°C). This lower temperature is key for deep dish so the edges don’t burn before the middle is done. Grease a 9×9 inch square baking pan really well. Like, *really* well. I usually butter it and then flour it or use baking spray with flour. You could probably get away with an 8×8 but it’ll be even thicker and might take longer.
- Mix the dry stuff: In a medium bowl, whisk together the extra flour, cocoa powder, baking powder, and salt. Just a quick whisk to get rid of any lumps.
- Make the batter magic: In a large bowl, follow the instructions on your brownie mix box for the fudgy version. Add the eggs, oil, and water it calls for. Mix ’em up. Now, pour in that glorious melted butter and stir until it’s combined.
- Combine everything: Add the dry mixture form step 2 to the wet ingredients in step 3. Don’t overmix! Just stir until *just* combined, you don’t want to develop too much gluten, makes ’em tough. You’ll still see little streaks of flour, and that’s totally fine. Actually, I find it works better if you stop just a bit early.
- Add the chocolatey goodness: Stir in about three-quarters of the chocolate chips (and any other optional add-ins like nuts!). Save the rest for the top. This is where I usually sneak a taste of the batter. Don’t tell anyone.
- Into the pan they go: Pour the thick batter into your prepared 9×9 pan. Spread it out evenly. Sprinkle the remaining chocolate chips (and any extra goodies) over the top.
- Bake ’em up: Pop the pan into your preheated oven. Now, baking time is a bit variable depending on your oven and how fudgy you like them. Start checking around 45 minutes. A toothpick inserted into the *center* should come out with moist crumbs attached, not totally clean and not with wet batter. It’s better to underbake slightly than overbake! It’s gonna take anywhere form 45 to maybe even 60 minutes. Be patient.
- Cooling is Crucial: This is the hardest part, honestly. Let the brownies cool completely in the pan on a wire rack. I know, I know. But this lets them set up and get that perfect fudgy texture. Trying to cut them warm is a hot mess (pun intended!). They’ll be delicate.
And that’s it! See? Not scary at all.
Stuff I Figured Out Along the Way
Okay, so trial and error taught me a few things about these deep dish brownies. First off, that lower oven temperature is *no joke*. Tried baking at the box temp once and the edges were rocks while the middle was soup. Not good. Also, greasing the pan *really* well is essential unless you want a fight getting them out. Using parchment paper with overhang is probably the smartest move, actually, helps lift them out easily for cutting. I always forget that step though! Oh, and resist the urge to overmix the batter. It’s tough, but those little bits of flour disappear during baking, honest. Overmixing makes them cakey, and we want fudgy, remember?

Feeling Adventurous? Try These!
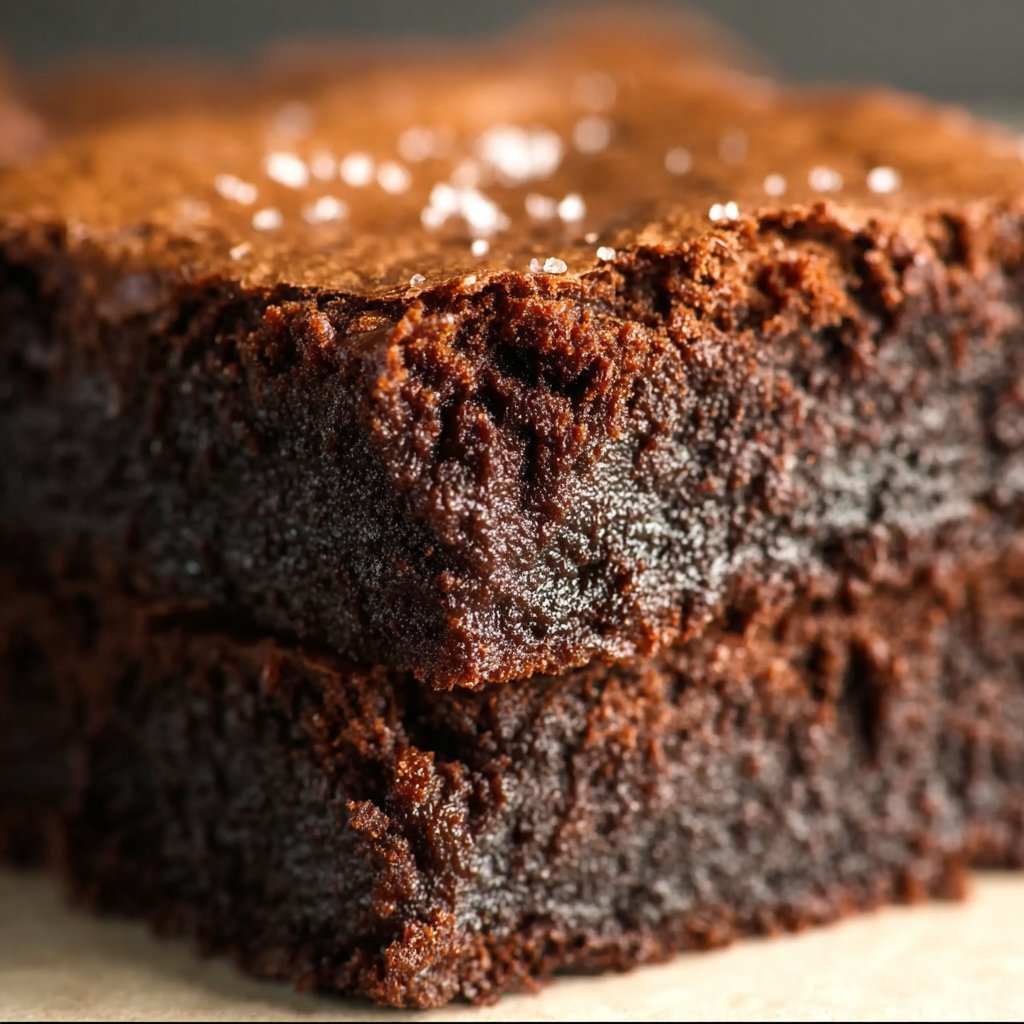
I’ve played around with these a bit. Adding peanut butter swirls (just melt some PB and swirl it into the top of the batter before baking) is always a winner. Mint chocolate chips? Yep, done that, amazing around the holidays. One time I tried adding instant coffee granules to the batter thinking ‘mocha!’… it was okay, but a little gritty. Wouldn’t recommend that one unless you dissolve the coffee first. A sprinkle of flaky sea salt on top right when they come out of the oven? Game changer. Seriously, try it.
Tools of the Trade (Or, What Pan Do I Need?)
Honestly, the main thing you need is a good quality 9×9 inch metal baking pan. Darker pans bake hotter, so if yours is dark, maybe shave a minute or two off the bake time or reduce the temp by another 5 degrees F. If you don’t have a 9×9, an 8×8 will work, but as I said, they’ll be thicker. Just keep an eye on the baking time. A rubber spatula is super helpful for mixing and getting all the batter out of the bowl (don’t waste that goodness!).

Keeping Your Brownies (If They Last!)
If by some miracle you have leftovers, store them in an airtight container at room temperature for up to 3-4 days. Though honestly, in my house it never lasts more than a day! They actually firm up a bit overnight, and I think they taste even better the next day. You can technically freeze them too, wrapped tightly, but mine have never made it to the freezer.
Serve ‘Em Up!
These are awesome just as they are, cut into big, chunky squares. But if you wanna get fancy, serve ’em warm with a scoop of vanilla ice cream? Heck yeah. Or maybe a drizzle of hot fudge sauce? My absolute fave is with a cold glass of milk. Simple, perfect. Sometimes I dust them with a little powdered sugar too, just to make ’em look pretty.
Lessons Learned the Hard Way (My ‘Pro’ Tips)
Okay, so I’ve messed up brownies more times than I care to admit. My biggest ‘pro’ tip? Don’t rush the cooling! I once tried cutting them warm because I was impatient (rookie mistake!) and they just kinda fell apart into a delicious, but messy, heap. Also, check for doneness with a toothpick in the center, not the edge. The edges will always be done first. And seriously, don’t overbake if you want that ultimate fudgy middle. When in doubt, pull ’em out a minute or two early.
Burning Questions? I Got Ya Covered!
* **Can I use a different size pan?** Yep, an 8×8 will make them extra thick, might need a longer bake. A 9×13 would make them thinner, more like standard brownies, you’d need to reduce the baking time significantly, probably closer to the box mix instructions.* **My brownies look… shiny?** That’s the fudginess! It’s a good sign. Means you didn’t overbake ’em probably.* **Can I make these ahead of time?** Absolutely! They keep well for several days. I think they’re even better the day after baking once they’ve had time to fully set.* **What if I don’t have cocoa powder?** Hmmm, you could probably skip the *extra* cocoa and flour, but they might not be quite as thick or intensely chocolatey. The cocoa really boosts that deep chocolate flavor. Don’t skip the flour though, that’s key to the structure in a deep dish.* **Help! They’re stuck in the pan!** Ah, didn’t grease it well enough did ya? Happens to the best of us. Try running a plastic knife carefully around the edges. If they’re really stuck, you can try warming the bottom of the pan slightly (like, dip it in a shallow pan of hot water for a few seconds) but be careful not to melt the brownies too much!
Hope you give these a whirl! They’re genuinely easy and deliver maximum chocolate payoff. Let me know if you try ’em!
Ingredients
- 1 cup (2 sticks) unsalted butter, melted
- 2 cups granulated sugar
- 1 cup unsweetened cocoa powder
- 1 teaspoon salt
- 1 teaspoon baking powder
- 4 large eggs
- 2 teaspoons vanilla extract
- 1 1/2 cups all-purpose flour
- 1 cup chocolate chips (optional)
Instructions
-
1Preheat oven to 350°F (175°C). Grease and flour a 9×13 inch baking pan.
-
2In a large bowl, whisk together the melted butter, sugar, cocoa powder, salt, and baking powder until well combined.
-
3Beat in the eggs one at a time, then stir in the vanilla extract.
-
4Gradually add the flour, mixing until just combined. Do not overmix.
-
5Fold in the chocolate chips, if using.
-
6Pour the batter into the prepared baking pan and spread evenly.
-
7Bake for 30-35 minutes, or until a toothpick inserted into the center comes out with moist crumbs (not wet batter).
-
8Let the brownies cool completely in the pan on a wire rack before cutting into squares.
Approximate Information for One Serving
Nutrition Disclaimers
Number of total servings shown is approximate. Actual number of servings will depend on your preferred portion sizes.
Nutritional values shown are general guidelines and reflect information for 1 serving using the ingredients listed, not including any optional ingredients. Actual macros may vary slightly depending on specific brands and types of ingredients used.
To determine the weight of one serving, prepare the recipe as instructed. Weigh the finished recipe, then divide the weight of the finished recipe (not including the weight of the container the food is in) by the desired number of servings. Result will be the weight of one serving.
Did you make this recipe?
Please consider Pinning it!!


