
You ever have one of those cozy weekends when you want a bakery treat but absolutely cannot bring yourself to leave the house (or look presentable for the neighbors)? That was basically me last winter, and it led to this Blueberry Danish recipe. I still remember the first disaster version—my filling ran everywhere, and the dog snagged half of the batch, but the smell alone had my family floating into the kitchen. These days, it’s a breakfast classic at our house, and my teenager thinks I invented it. I haven’t set the record straight yet…
Why I Go Back to This blueberry Danish Again and Again
I make this when I want to impress people but don’t want to break a sweat—or wash a zillion pans. My family basically wrestles for the last one, which is funny because my son insists he “doesn’t even like blueberries.” (He eats three every time.) It’s gotten me out of bringing store-bought pastries to potlucks, which for some reason always get me a side eye from my mother-in-law. Also, I’m not afraid to admit, the first few times I made this, I way overfilled the centers, so if you see a blueberry river on your baking tray, that’s pretty normal.
The Ingredients (and Some of My Own Swaps)
- 1 sheet puff pastry, thawed (honestly, I grab the store brand; no shame. Grandma swore by Pepperidge Farm, though!)
- 3/4 cup fresh blueberries (frozen works if that’s all you have; don’t thaw – or else you get a weird goop)
- 2 tablespoons granulated sugar (I’ve used brown sugar during a “whoops” moment—pretty good!)
- 1 tablespoon lemon juice (bottled or fresh—depends what’s rolling around in your fridge)
- 1/2 teaspoon lemon zest (optional but really jazzes it up)
- 4 ounces cream cheese, softened (if you only have ricotta, it’s slightly different, but still tasty)
- 2 tablespoons powdered sugar (I eyeball this sometimes, not gonna lie)
- 1/2 teaspoon vanilla extract (or almond if you’re feeling fancy)
- 1 egg, beaten (this is just for brushing, so don’t stress if you use only half)
- A pinch of salt
How I Throw This Together (With a Few Sidetracks…)
- First, preheat your oven to 400°F (200°C) and dig out a baking sheet—line it with parchment if you got it, but I’ve also used regular foil when I’ve run out.
- Unfold the puff pastry on a lightly floured surface. Slice it into 6 rectangles. They won’t all be the exact same size. It’s fine. Actually, I think the weird edge ones get crispier, so I save those for myself.
- In a small bowl, mix blueberries, granulated sugar, lemon juice, and lemon zest. Give it a toss. It’ll look a little soupy if you use frozen berries; that’s normal.
- In another bowl, beat together softened cream cheese, powdered sugar, vanilla, and that pinch of salt. This is usually when I sneak a taste, you know, for “quality control.” If it’s too stiff, a splash of milk loosens it up.
- Now, spread a tablespoon-ish of the cream cheese mix in the center of each pastry rectangle, leaving some edges clear (trust me – oozing is inevitable anyway, but try).
- Spoon some blueberry mixture on top. I try to keep the filling somewhat contained, but—hey—no judgment if it escapes.
- Fold up the edges a bit to sort of “hug” the filling, and brush the exposed pastry with your beaten egg. Or don’t; once I forgot and they still browned. Just not as shiny.
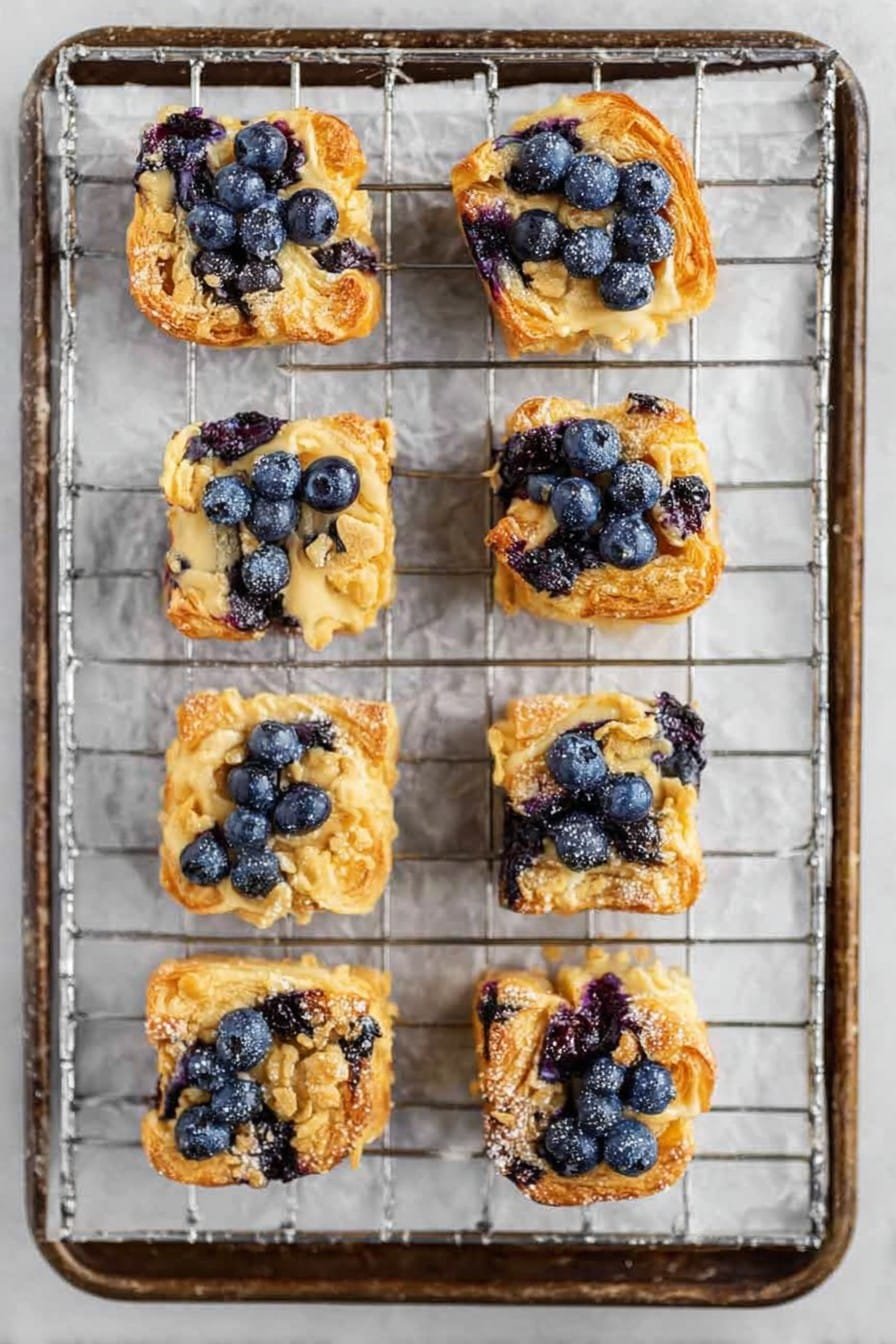
- Bake for 18-22 minutes, or until golden and puffed. The kitchen will smell like a Scandinavian bakery by then, and honestly, the waiting is the hardest part.
- Let them cool a little. Or don’t. I’ve burned my mouth every single time I’ve tried to eat one right off the tray. Worth it, though.
The Little Things I’ve Learned
- If your filling escapes during baking, just scoop it back on top. It’s rustic, OK?
- Leaving room at the edges really does help with spillage, but mine still leak sometimes.
- Swap out blueberries for raspberries if that’s what’s in the fridge. Just don’t try strawberries—they turn runny and sad (learned that the hard way).
Other Ways I’ve Played Around With This
- I’ve tossed in a handful of chocolate chips with the cheese layer. Wildly delicious.
- Tried with apricot jam instead of fresh fruit. Wasn’t a crowd favorite here, but you might love it!
- Once made them “mini” by cutting the pastry smaller. Cute, but fiddly—my patience wore thin fast.

What You’ll Need (and What to Do If You Don’t Have It)
- Baking sheet (but I’ve used an upside-down roasting pan in a pinch; nobody knew)
- Parchment paper or foil
- Sharp knife or even a pizza cutter for the pastry
- Two mixing bowls
- Brush for the egg (or hey, flick it on with your fingers; we’re not fancy here)
Storing Your Blueberry Danish (But They Disappear Fast!)
If you somehow have leftovers—congrats! I put them in an airtight container. Room temp for a day, fridge for a couple more, but honestly, I’ve never seen one make it 24 hours around here. They’re still surprisingly tasty the next day, maybe even more so (am I just imagining that? Maybe).
How I Like to Serve These
I’m all about coffee and danishes, so mornings are my favorite. But my youngest decided they made the perfect after-school snack with a glass of icy milk, and now it’s just what we do. Sometimes, just for laughs, I dust them with extra powdered sugar right at the table, and pretend we’re in a Parisian café. The dog still lurks underfoot regardless.
Pro Tips (from Mess-Ups Past)
- I once tried to skip softening the cream cheese. Do not recommend. Lumpy filling = weird texture.
- Don’t overload the Danish! Every time I do, at least half the blueberries make a bid for freedom in the oven.
- Actually, let these cool a bit so the filling sets up—or you’ll have a molten mess (I do it anyway, but at least consider waiting 10 minutes).
FAQ (Real Questions From Overexcited Friends and One Disbelieving Uncle)
- Can I use frozen blueberries? Totally! Just toss ’em in straight from the freezer—don’t thaw first or you’ll get blueberry soup.
- Is puff pastry really necessary? Can’t I use crescent rolls? I’ve tried it. They’re tasty, though a bit less crispy and more fluffy, like bread. Not the same, but still edible!
- How do I make them ahead? I assemble everything up to the egg wash and keep ’em in the fridge overnight, then just bake in the morning. Or at least, that’s the idea—my family tends to “sample” the unbaked ones if I don’t hide them well…
- What if I have no cream cheese? Ricotta with some extra sugar isn’t bad. Or Greek yogurt (strained); I’ve done it, although it’s a little less rich.
- Will the dog eat these if I leave them unattended? Don’t ask. (But yes.)
So go on, give these a whirl—even if you’re a little distracted or out of a few “official” ingredients. Blueberry Danishes have a way of turning household chaos into something delightfully sweet. Happy baking!
Ingredients
- 1 sheet puff pastry, thawed (honestly, I grab the store brand; no shame. Grandma swore by Pepperidge Farm, though!)
- 3/4 cup fresh blueberries (frozen works if that’s all you have; don’t thaw – or else you get a weird goop)
- 2 tablespoons granulated sugar (I’ve used brown sugar during a “whoops” moment—pretty good!)
- 1 tablespoon lemon juice (bottled or fresh—depends what’s rolling around in your fridge)
- 1/2 teaspoon lemon zest (optional but really jazzes it up)
- 4 ounces cream cheese, softened (if you only have ricotta, it’s slightly different, but still tasty)
- 2 tablespoons powdered sugar (I eyeball this sometimes, not gonna lie)
- 1/2 teaspoon vanilla extract (or almond if you’re feeling fancy)
- 1 egg, beaten (this is just for brushing, so don’t stress if you use only half)
- A pinch of salt
Instructions
-
1First, preheat your oven to 400°F (200°C) and dig out a baking sheet—line it with parchment if you got it, but I’ve also used regular foil when I’ve run out.
-
2Unfold the puff pastry on a lightly floured surface. Slice it into 6 rectangles. They won’t all be the exact same size. It’s fine. Actually, I think the weird edge ones get crispier, so I save those for myself.
-
3In a small bowl, mix blueberries, granulated sugar, lemon juice, and lemon zest. Give it a toss. It’ll look a little soupy if you use frozen berries; that’s normal.
-
4In another bowl, beat together softened cream cheese, powdered sugar, vanilla, and that pinch of salt. This is usually when I sneak a taste, you know, for “quality control.” If it’s too stiff, a splash of milk loosens it up.
-
5Now, spread a tablespoon-ish of the cream cheese mix in the center of each pastry rectangle, leaving some edges clear (trust me – oozing is inevitable anyway, but try).
-
6Spoon some blueberry mixture on top. I try to keep the filling somewhat contained, but—hey—no judgment if it escapes.
-
7Fold up the edges a bit to sort of “hug” the filling, and brush the exposed pastry with your beaten egg. Or don’t; once I forgot and they still browned. Just not as shiny.
-
8Bake for 18-22 minutes, or until golden and puffed. The kitchen will smell like a Scandinavian bakery by then, and honestly, the waiting is the hardest part.
-
9Let them cool a little. Or don’t. I’ve burned my mouth every single time I’ve tried to eat one right off the tray. Worth it, though.
Approximate Information for One Serving
Nutrition Disclaimers
Number of total servings shown is approximate. Actual number of servings will depend on your preferred portion sizes.
Nutritional values shown are general guidelines and reflect information for 1 serving using the ingredients listed, not including any optional ingredients. Actual macros may vary slightly depending on specific brands and types of ingredients used.
To determine the weight of one serving, prepare the recipe as instructed. Weigh the finished recipe, then divide the weight of the finished recipe (not including the weight of the container the food is in) by the desired number of servings. Result will be the weight of one serving.
Did you make this recipe?
Please consider Pinning it!


