
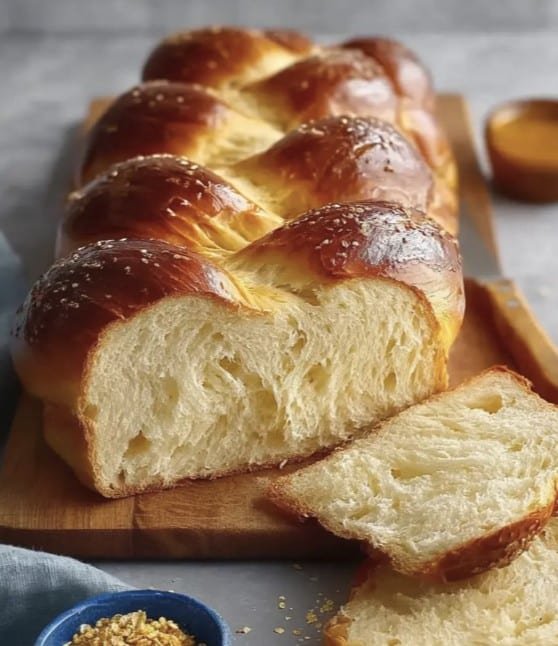
Making Challah: Why I Keep Baking This Fluffy Loaf
You ever have one of those recipes you just… keep coming back to, no matter how many new things you try? For me, that’s this soft, pillowy challah bread. The first time I made it, my braid sort of flopped sideways (it looked more like a heavily-armed sea creature than a loaf of bread), but honestly, who cares—it smelled like heaven and tasted even better. My kids ate half the loaf before it even cooled. If I’m honest, I bake this more for the comfort of it than the perfection. Oh, and there was this one time I forgot to set a second timer and it turned out more like giant croutons than breakfast bread… Still delicious! (Toast and slathered with butter saved the day.)
Why You’ll Love This Silky Challah (and Maybe Sigh With Relief)
I make this when I want our house to feel like a bakery—or on weekends when the only plan is lounging around with endless cups of coffee and warm, soft bread on the table. My family goes wild for the buttery flavor, and I love it for breakfast ideas: French toast, simple slices with jam, the works. If you hate dough sticking to your fingers (me too), this one really doesn’t cling much. There’s a pause for rising where you can sneak a quick nap—definitely a bonus when your energy is more ‘sloth’ than ‘chef.’
Here’s What You’ll Need (And What I Sometimes Sub In)
- 4 cups (about 540g) bread flour (I’ve used all-purpose flour in a pinch—it’s a smidgen less chewy but still dreamy)
- 2 1/4 teaspoons (1 packet) active dry yeast (instant yeast actually works fine; just skip the bloom step)
- 1/2 cup lukewarm water (not too hot or you’ll zap the yeast—I learned the hard way, yikes)
- 2 large eggs, room temp (if you forget, stick ‘em in warm water for 10 mins)
- 1 large egg yolk (save the white for egg wash if you want, or make a very tiny omelette?)
- 1/4 cup (50g) sugar (granulated, but once I tried honey—delicate and floral!)
- 1/4 cup (60g) melted butter (sometimes I use sunflower oil if I’m out, my grandmother always insisted on plugrá butter though… Any butter works fine.)
- 1 1/2 teaspoons salt (sea salt, kosher, whatever’s handy I say)
- A splash of milk for brushing (or just water—lazy day move)
- Optional: sesame seeds or poppy seeds for topping
How to Make Buttery Challah Bread (With Odd Little Tips)
- First, bloom the yeast: In a small bowl, mix the yeast, sugar, and lukewarm water. Wait 5 to 10 minutes while it gets all foamy. (Sometimes I check it early because I’m impatient—if there’s bubbles, you’re set!)
- In a big mixing bowl, combine flour, salt, eggs, yolk, and melted butter. Pour in your bubbly yeast mixture. Stir until it just comes together—the dough will look rough. That’s normal! (this is where I sneak a tiny taste of dough; don’t judge)
- Turn it out on a floured counter and knead for 8-10 mins. It should be smooth-ish and stretchy. If your arms get tired, take a breather—dough doesn’t mind.
- Pop the dough in an oiled bowl, cover with a damp towel or plastic wrap, and let it rise for 60-90 mins. It should double in size, though sometimes mine only gets 1.75x bigger and it’s still great.
- Punch down (gently, not like you’re mad at Monday), then divide into 3 equal pieces. Roll each into a long rope (don’t overthink it), then braid. Tuck ends underneath.
- Place your braided loaf on a lined baking sheet. Cover with a towel and let rise another 30-40 mins. Or as long as it takes to have a cup of tea and scroll your phone.
- Preheat oven to 350°F (175°C). Brush the loaf with your egg white or a splash of milk if you like a shiny crust. Scatter on seeds if you’re feeling fancy.
- Bake 25-30 mins until golden and your kitchen smells amazing. Tap it—if it sounds hollow, you’re done. Let it cool (or not, but beware molten steam inside!)
Notes From the Trenches (Aka, Things I Figured Out the Messy Way)
- If the dough seems too sticky, add a couple tablespoons of flour. If it’s dry, splash on a bit more water—just don’t drench it.
- I once used self-raising flour by accident. Epic poofiness. Didn’t hate it, but go with bread or all-purpose if you want classic texture.
- My loaf looks… well, “artistic” sometimes. Still, tastes brilliant every time.
Fun Variations I’ve Tried (And Sometimes Regretted)
- Honey: Swapping half the sugar for honey makes challah subtly sweet and floral. Big win.
- Cinnamon Swirl: Sprinkle cinnamon sugar on each strip before braiding. Slight overkill? Maybe, but amazing toasted next morning.
- Chocolate Chips: Toss a handful in the dough. My kids devoured it, though the chips do melt out the sides (hello, mess).
- Lemon zest: Tried this once—too bossy with the delicate bread flavor, so I skip it now.
Do You Really Need Fancy Tools?
A stand mixer with a dough hook is nice (makes kneading easier), but I usually just go with a mixing bowl and my own two hands—brings out the inner artisan. If you’re short on baking sheets, a pizza stone lined with parchment works. And in a pinch, I’ve proofed the dough in a soup pot. Improvisation is half the fun!
How to Store This (Though Good Luck Making It Last That Long!)
Wrap leftovers in a clean kitchen towel, then stash in a bread box, or just leave it on the counter. It’s best the first 2 days, though honestly, in my house it never lasts past breakfast. If you do end up with leftovers, makes incredible French toast or bread pudding. Actually, I think it tastes even better the next day—toasted till it’s golden.
How We Serve Challah at My Place
I love thick slices with butter and a bit of sea salt for breakfast. My mum, though, insists it gets a smear of homemade thick-cut marmalade. Sometimes, we use it for egg-in-a-hole, because why not get fancy? French toast, obviously. If there’s bacon involved, put a slice on top—it’s totally not traditional but oh so good.
Lessons Learned (or: “Don’t Rush, Trust Me”)
- Once, I tried to cut the kneading short. The crumb came out tough, not fluffy. Now I always push through the full 10 minutes, or at least close.
- If you forget the second rise, you get a pretty dense bread—but if you’re desperate, just call it ‘rustic’ and carry on.
- Don’t slice too soon. I always want to, but steam inside will make it gummy. Wait 15-20 mins (it’s hard, I know), for better slices.
Frequently Asked About Challah Bread (Because Everyone’s Curious!)
- Q: Can I make this vegan?
A: Sure thing—swap eggs with flax eggs and use oil instead of butter. Texture’s a bit different but still dreamy. Give it a whirl! - Q: Can I freeze challah?
A: Yep! Slice it up, wrap tightly, pop in the freezer. Toasts right from frozen. Makes weekdays feel like weekends. - Q: Why did my braid turn out kinda weird?
A: Happens to all of us. Usually means ropes weren’t even, or maybe over-proofed. But hey, ugly bread is still delicious bread! - Q: Can I double the recipe?
A: Definitely, but maybe use two bowls unless you’ve got serious upper body strength. I learned this the hard way—sticky elbows for days. - Q: Is there a shortcut for rising?
A: If your house is cold, pop the covered bowl in your (turned off!) oven with a mug of just-boiled water beside it. That hint of steam helps things along, but don’t skip rising altogether or it’ll turn out dense.
So, that’s my easy soft and buttery challah—turns any breakfast into an event, even if your braid looks a bit wobbly. Good luck holding onto leftovers!
Ingredients
- 4 cups (about 540g) bread flour (I’ve used all-purpose flour in a pinch—it’s a smidgen less chewy but still dreamy)
- 2 1/4 teaspoons (1 packet) active dry yeast (instant yeast actually works fine; just skip the bloom step)
- 1/2 cup lukewarm water (not too hot or you’ll zap the yeast—I learned the hard way, yikes)
- 2 large eggs, room temp (if you forget, stick ‘em in warm water for 10 mins)
- 1 large egg yolk (save the white for egg wash if you want, or make a very tiny omelette?)
- 1/4 cup (50g) sugar (granulated, but once I tried honey—delicate and floral!)
- 1/4 cup (60g) melted butter (sometimes I use sunflower oil if I’m out, my grandmother always insisted on plugrá butter though… Any butter works fine.)
- 1 1/2 teaspoons salt (sea salt, kosher, whatever’s handy I say)
- A splash of milk for brushing (or just water—lazy day move)
- Optional: sesame seeds or poppy seeds for topping
Instructions
-
1First, bloom the yeast: In a small bowl, mix the yeast, sugar, and lukewarm water. Wait 5 to 10 minutes while it gets all foamy. (Sometimes I check it early because I’m impatient—if there’s bubbles, you’re set!)
-
2In a big mixing bowl, combine flour, salt, eggs, yolk, and melted butter. Pour in your bubbly yeast mixture. Stir until it just comes together—the dough will look rough. That’s normal! (this is where I sneak a tiny taste of dough; don’t judge)
-
3Turn it out on a floured counter and knead for 8-10 mins. It should be smooth-ish and stretchy. If your arms get tired, take a breather—dough doesn’t mind.
-
4Pop the dough in an oiled bowl, cover with a damp towel or plastic wrap, and let it rise for 60-90 mins. It should double in size, though sometimes mine only gets 1.75x bigger and it’s still great.
-
5Punch down (gently, not like you’re mad at Monday), then divide into 3 equal pieces. Roll each into a long rope (don’t overthink it), then braid. Tuck ends underneath.
-
6Place your braided loaf on a lined baking sheet. Cover with a towel and let rise another 30-40 mins. Or as long as it takes to have a cup of tea and scroll your phone.
-
7Preheat oven to 350°F (175°C). Brush the loaf with your egg white or a splash of milk if you like a shiny crust. Scatter on seeds if you’re feeling fancy.
-
8Bake 25-30 mins until golden and your kitchen smells amazing. Tap it—if it sounds hollow, you’re done. Let it cool (or not, but beware molten steam inside!)
Approximate Information for One Serving
Nutrition Disclaimers
Number of total servings shown is approximate. Actual number of servings will depend on your preferred portion sizes.
Nutritional values shown are general guidelines and reflect information for 1 serving using the ingredients listed, not including any optional ingredients. Actual macros may vary slightly depending on specific brands and types of ingredients used.
To determine the weight of one serving, prepare the recipe as instructed. Weigh the finished recipe, then divide the weight of the finished recipe (not including the weight of the container the food is in) by the desired number of servings. Result will be the weight of one serving.
Did you make this recipe?
Please consider Pinning it!


