

Okay, Let’s Talk Banana Bread… But Make it Fancy!
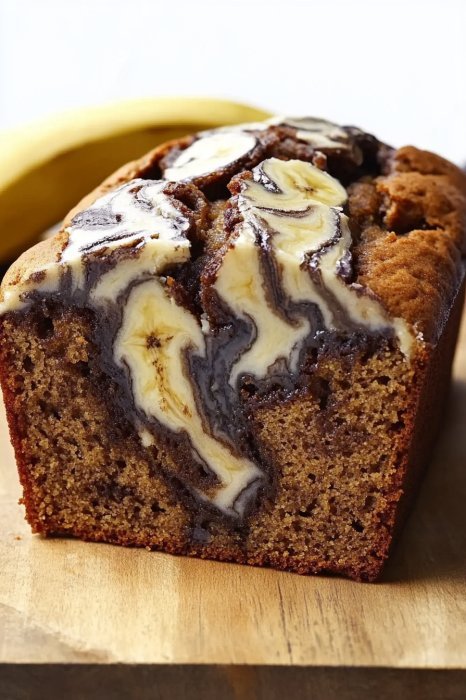
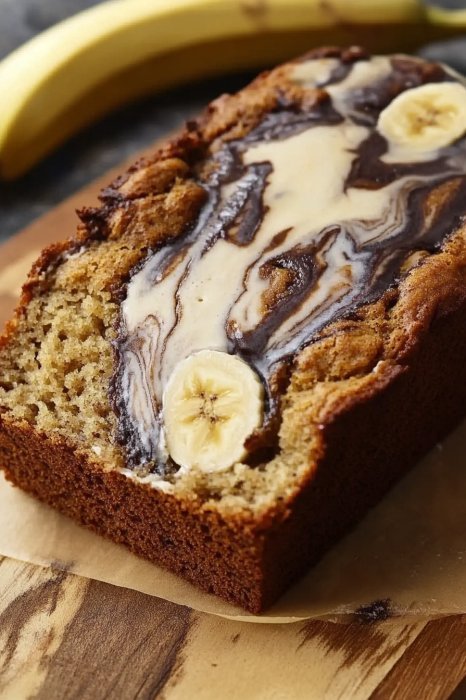
Right, who else ends up with those sad, spotty bananas languishing in the fruit bowl? Happens to me ALL the time. Honestly, it used to stress me out, like some kind of banana-related failure. But then I realised: it’s just an excuse to make banana bread! And not just any banana bread, but this gorgeous Marbled Banana Bread. It looks way more impressive than it actually is to make, which is my kind of baking, frankly. My kids see the chocolate swirl and suddenly those neglected bananas are the best thing ever. Funny how that works, isn’t it?
Why You’ll Probably End Up Making This Weekly
Seriously though, this recipe’s a keeper. I make this when:
- I need to use up bananas (obviously!).
- We have friends popping round unexpectedly – it whips up pretty fast.
- I just need a little bit of cozy comfort food, you know? Especially with a cuppa.
- My family goes crazy for this because… well, chocolate and bananas, duh! (Plus the swirly pattern is just fun).
It took me a few goes to get the swirl *just* right without turning the whole thing into chocolate banana bread (which is also good, but not the point here!). It’s surprisingly forgiving though, even if your marbling isn’t perfect first time.
What You’ll Need (The Bits and Bobs)
Okay, ingredient time. Don’t stress too much about exact brands, mostly.
- Overripe Bananas: About 3 medium ones, the spottier the better! Seriously, green bananas just won’t work here. You need that mushy sweetness.
- Flour: Just regular all purpose flour, about 1 and 3/4 cups (around 220g). I’ve used self raising flour in a pinch, just leave out the baking soda then, but all purpose is generally better for this.
- Sugar: I use 3/4 cup (150g) of granulated sugar. You could probably use brown sugar for a more caramelly vibe, but I haven’t tried that combo with the chocolate yet.
- Butter: Half a cup (113g) of unsalted butter, melted. My gran swore by salted butter for everything, but I prefer unsalted for baking so I can control the salt.
- Egg: One large egg, lightly beaten.
- Sour Cream or Yogurt: 1/4 cup (60g). Full fat plain yogurt or sour cream gives it lovely moisture. I often just use whatever yogurt I have open!
- Vanilla Extract: 1 teaspoon. Good vanilla makes a difference, but any will do.
- Baking Soda: 1 teaspoon.
- Salt: Just a pinch, maybe 1/4 teaspoon.
- For the Chocolate Swirl:
- Cocoa Powder: 2 tablespoons (unsweetened). Quality matters a bit more here; something like King Arthur’s Black Cocoa gives an intense colour, but regular Dutch process is great too.
- Sugar: 1 tablespoon extra sugar for the chocolate bit.
- Milk or Water: 1-2 tablespoons, just enough to make a paste.
- Optional: A handful of chocolate chips or chopped walnuts stirred into the plain batter? Go for it!
Right Then, Let’s Get Baking!
1. Prep time: First things first, preheat your oven to 350°F (175°C). Grease and flour a standard loaf tin (around 9×5 inches). Or use baking paper if you hate washing up as much as I do. A little overhang makes it easier to lift out later.
2. Mash those Nanas: In a big bowl, mash up your bananas. Don’t go crazy making it perfectly smooth; some lumps are good! Gives it texture. I just use a fork.
3. Mix the Wet Stuff: Stir the melted butter into the mashed bananas. Then add the sugar, beaten egg, sour cream (or yogurt), and vanilla. Give it a good mix.
4. Add the Dry Stuff: In a separate bowl (or if you’re lazy like me, sometimes just carefully on top of the wet stuff), whisk together the flour, baking soda, and salt. Tip this into the wet ingredients. Now, mix *just* until combined. Seriously, don’t overmix! Lumpy is okay. Overmixing makes it tough. This is probably the most important step for a tender crumb.
5. Divide and Conquer (for the swirl!): Scoop out about a third of the batter into a smaller bowl. Add the cocoa powder, the extra tablespoon of sugar, and 1 tablespoon of milk/water to this smaller portion. Mix it up until you have a chocolatey batter. If it seems super thick, add that extra splash of milk/water until its roughly the same consistency as the plain batter.
6. Get Marbling: Okay, this is the fun bit. Dollop spoonfuls of the plain batter and the chocolate batter alternately into your prepared loaf tin. Try to get blobs next to and on top of each other. Once all the batter is in, take a butter knife or a skewer and gently swirl it through the batter just a few times. Don’t overdo it, or you’ll lose the distinct marble effect! Two or three passes is usually plenty.
7. Bake it!: Pop it in the preheated oven. Bake for 50-60 minutes. It’s done when a skewer inserted into the center comes out clean (or with moist crumbs, not wet batter). Ovens vary though, so start checking around 45 minutes. Mine usually takes closer to 55. The top should be lovely and golden brown.
8. Cool Down: This is torture, I know, because your kitchen smells amazing right now. But let the banana bread cool in the tin for about 10-15 minutes before you carefully turn it out onto a wire rack to cool completely. Patience, young grasshopper! Cutting it too soon can make it crumble.
Little Notes I’ve Made Along the Way
- Don’t worry if your marbling isn’t perfect. Sometimes it’s more stripey, sometimes more blotchy. It always tastes good, that’s the main thing.
- If the top starts browning too quickly before the middle is cooked, you can loosely tent a bit of foil over it for the last 10-15 minutes of baking.
- Make sure your baking soda isn’t ancient! It does lose its oomph over time. I learned that the hard way with a rather flat loaf once.
- The riper the bananas, the sweeter the bread. You might even be able to slightly reduce the sugar if your bananas are practically black (but I usually stick to the recipe).

Fancy Trying Something Different? (Variations)
I love experimenting! Sometimes successfully, sometimes… less so.
- Extra Choc Chip: Stirring half a cup of chocolate chips into the plain batter before swirling is *chef’s kiss*.
- Nutty Version: Toasted walnuts or pecans folded into the plain batter add a great crunch. About half a cup works well.
- Espresso Kick: Adding a teaspoon of instant espresso powder to the chocolate mixture really deepens the flavour. Yum!
- What Didn’t Work So Well: I once tried adding cinnamon to the plain batter. It wasn’t *bad*, but it kind of competed with the chocolate flavour in a way I didn’t love. Maybe just a tiny pinch would be okay? Still deciding on that one.
Stuff You’ll Need (Equipment Wise)
Nothing too fancy needed, honestly.
- A standard 9×5 inch loaf tin (or near enough). If yours is glass, you might need to lower the oven temp slightly.
- Mixing bowls (a big one and a smaller one).
- Measuring cups and spoons.
- A whisk or fork for mixing. A spatula is handy too for scraping the bowl.
- A skewer or knife for swirling and testing doneness.
- Wire rack for cooling (important!).
No stand mixer required! Elbow grease works just fine here, and helps avoid overmixing.
How to Store It (If It Lasts!)
Once it’s completely cool (and I mean completely!), store it in an airtight container at room temperature. It’s usually best eaten within 2-3 days. Though honestly, in my house it rarely sees day two! I actually think this marbled banana bread tastes even better the next day sometimes, the flavours meld together nicely.
How We Eat It Around Here
My absolute favourite way? Slightly warm (you can pop a slice in the microwave for 10 seconds) with a slathering of butter. Simple perfection. It’s also amazing for breakfast with coffee, or as an afternoon snack. No judgement if you just eat it straight form the loaf tin, I’ve been there.
Pro Tips Learnt the Hard Way
- Don’t Rush Cooling: I once tried slicing it practically straight from the oven because I was impatient. Big mistake. It crumbled everywhere! Let it cool properly on the rack.
- Measure Flour Correctly: Scooping flour straight from the bag with your measuring cup packs it in too tightly, leading to dry bread. Spoon the flour into the cup, then level it off. Or better yet, use a kitchen scale if you have one – using weights is way more accurate for baking.
- Check Banana Ripeness: Using yellow bananas with just a few spots? Your bread won’t be as sweet or moist. Wait until they’re properly brown and soft. Trust the process!
Quick FAQs (Questions I Get Asked!)
Help! My bread is dry! What did I do wrong?
Ah, yeah, that can happen. Usually it’s either too much flour (see my tip above about measuring!) or overbaking. Next time, maybe check for doneness a few minutes earlier? Also, make sure you used enough banana and the sour cream/yogurt!
Can I freeze this Marbled Banana Bread?
Totally! Let it cool completely, then wrap it really well in plastic wrap, then foil (or pop it in a freezer bag). It should keep well for a couple of months. Just thaw it at room temperature before slicing.
Can I make muffins instead?
Yep! Just divide the batter (marbling within each cup if you can be bothered, or just swirl on top) into muffin tins lined with paper cases. They’ll bake much faster, probably around 18-22 minutes. Keep an eye on them.
My swirl just sank to the bottom!
Hmm, maybe the chocolate batter was a bit too thin or heavy compared to the plain batter? Make sure they’re roughly the same consistency. Or perhaps you swirled a *bit* too enthusiastically? Gentle does it!
Hope you give this marbled banana bread a go! Let me know how it turns out. Happy baking!


