
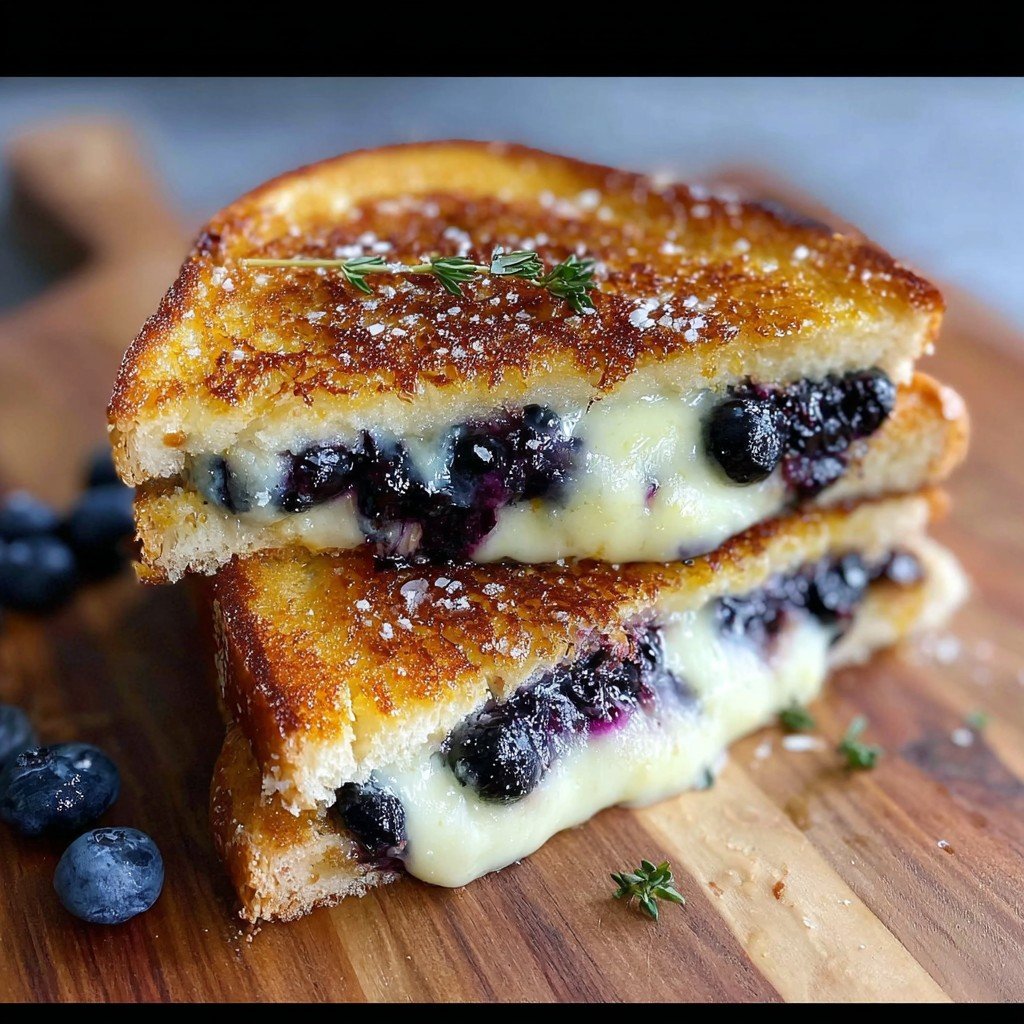
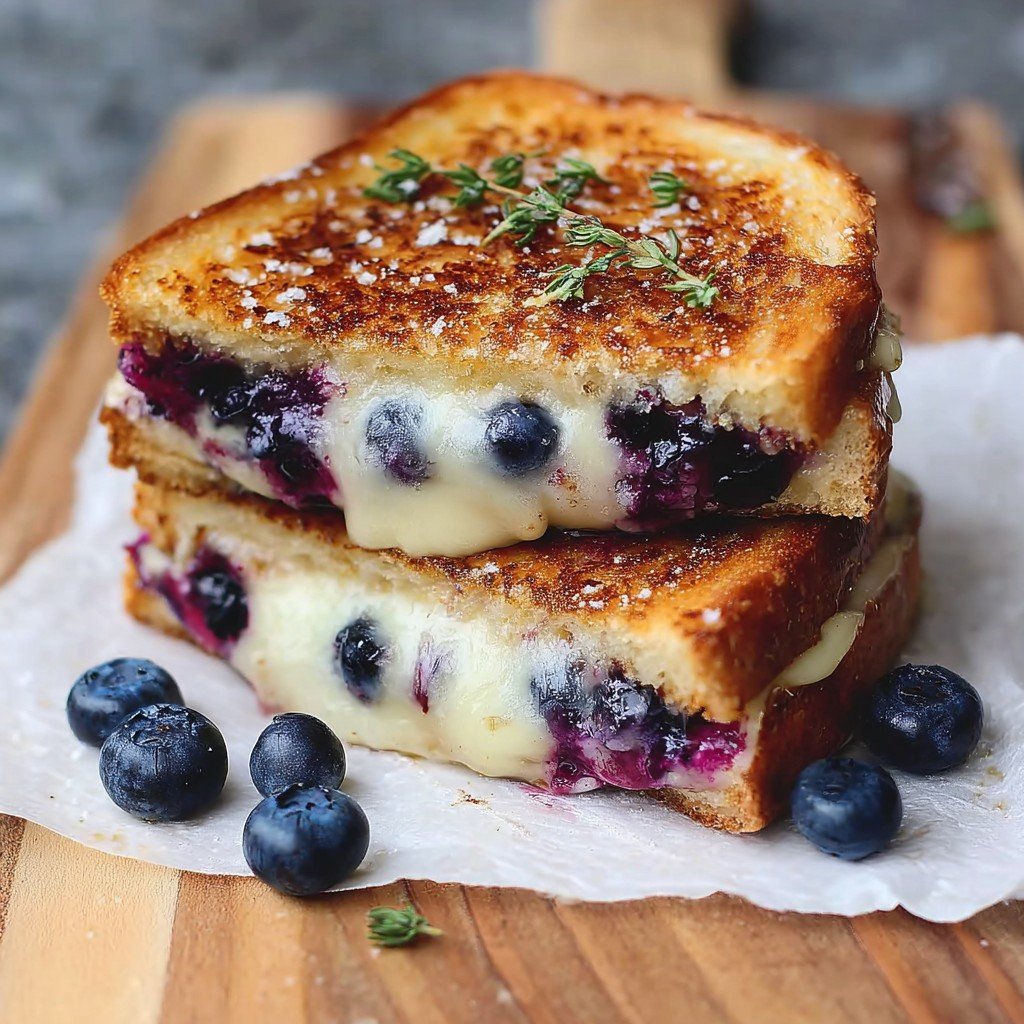
Alright, so let me set the scene: It’s Saturday, it’s raining (because of course it is), and I want something comforting but also a little wild—like, “responsible adult at lunch, reckless flavor-maniac at dinner” kind of vibe. Enter my trusty crispy blueberry grilled cheese. First time I made this, my sister was staying over and we ended up eating them on the living room floor, totally ignoring the plates (the spirit of grilled cheese, if you ask me). If you’ve never tried fruit with gooey cheese stuffed between crispy bread, well, you might question your choices… but you won’t regret giving this a go!
Why You’ll Love This—A Little Unhinged, a Lot Delicious
I make this when I’m bored of tomato soup and basic cheese toasties. My family goes a bit bonkers for it, especially since you get this pop of sweet blueberry right in the middle of all that gooey, crispy goodness (my nephew calls it “breakfast in a sandwich”). Plus, it’s super easy—unless you get distracted and burn one side (guilty). If long ingredient lists make you run for the hills, relax; this one’s as simple as wearing socks (well, except if you lose them as I do). And if you like to mess with sweet and savory flavors, make extra: someone always steals the last half!
What You’ll Need Ingredient-Wise
- 2 slices sturdy sourdough bread (but honestly, white sandwich bread is fine—my grandmother swore by WonderBread…)
- 3/4 cup shredded mozzarella or Monterey Jack (I sometimes just use pre-sliced cheese when I’m lazy)
- 1/3 cup fresh blueberries (I’ve tried frozen too in a pinch; just thaw and pat dry—otherwise it gets messy!)
- 1 tablespoon softened butter (I use salted, but whatever you grab works—olive oil if you’re feeling fancy)
- 1/2 teaspoon honey (optional, for extra zing)
- Pinch of black pepper (surprisingly good, or skip if you’re not keen)
How To Make It—With Room for Chaos
- Butter one side of each bread slice pretty generously. If they’re a bit lumpy, don’t panic—just spread as best you can. (This is where my butter always tears the bread, but it sorts itself in the pan!)
- Flip those babies over so the unbuttered sides face you. Layer cheese on one slice, sprinkle the blueberries on top, and then, if you’re in the mood, drizzle with honey and a cheeky pinch of pepper. Top with the second slice, buttered side out.
- Heat up a nonstick skillet over medium (or whatever pan you have; I’ve done this in a cast iron, too). Once hot, drop in the sandwich. Press it down a little—not too hard, unless you like extra-flat toasties.
- Cook for about 3-4 minutes per side, checking to make sure it’s not burning (my brain always wanders here so set a timer if you’re like me). Flip with confidence! Don’t worry if blueberries leak and things get messy—the browner, the better.
- Once both sides are golden and crispy, remove from the pan. Let it sit for a minute (the cheese is basically molten lava at this point—I always forget and burn my tongue, oops).
- Slice diagonally so it looks fancy. Sneak a bite, then serve the rest (if there’s any left…)
A Few Notes (From Forgotton Mistakes)
- Frozen blueberries are fine—but pat them dry or everything gets wet and weird. Trust me, soggy grilled cheese is not the move.
- If you’re out of butter, you can totally use a swipe of mayo for crispiness. Sounds odd, but works wonders.
- And if you spill cheese out the sides, those crispy edges are actually my favorite part (I call dibs on the pan bits every time).
Variations—My Kitchen Experiments (Not All Winners…)
- Tried swapping blueberries for strawberries once. Not bad, but gets mushy—tastes like jammy cheese. Maybe not my finest.
- Lemon zest sprinkled in with the blueberries? Actually, that wakes it up if you like a brighter tang. I recommend.
- One time I threw chopped walnuts in for crunch, and that sort of turned it into lunch-dessert—strangely satisfying.
Do You Really Need a Fancy Pan?
Not really. I usually drag out my old nonstick, but I’ve definitely done this on a sandwich press and, once, directly on the barbecue during a camping trip (bit of char, lotta flavor). If you only have a regular frying pan, just squish the sandwich with a spatula for extra toastiness.
Will It Last? Storage Thoughts
If by some wild twist of fate you have leftovers, wrap them up and stash in the fridge; they’ll be fine for a day or so. Actually, I think the flavors settle better overnight, but let’s be real—mine never survive past lunchtime at my place. To reheat, go low and slow in a pan or oven or it’ll get chewy.
How to Serve—Hey, Whatever’s Handy
Personally, I like mine with a big mug of milky tea and nothing else (old habits die hard). My brother asks for a side of chips—bit odd, but no judgment. When I’m feeling fancy, I’ll scatter a few extra blueberries on the plate so it looks more like I planned things out.
Lessons I Learned the Hard Way
- Do NOT crank up the heat thinking it’ll cook faster—burned bread, cold cheese disaster. Trust me, just wait it out.
- Pressing down with a spatula is good, but squashing it totally flat? Not so good unless you like more crust than filling.
- I once skipped the butter to “save calories”—totally regretted it. Dry bread, sad sandwich.
Real Questions People Actually Ask Me
- Can I use a different fruit? Yup! Raspberries, blackberries, even chopped apple—though apple stays a bit crunchy, which is either weird or genius depending on how hungry you are.
- Can you make this dairy-free? Sure, use a vegan cheese and plant-based butter (or even olive oil). Just watch the melting; some of those vegan slices act more like plastic, no shade.
- Why isn’t my grilled cheese getting crispy? Might need more butter, or your pan isn’t hot enough. Or maybe you’re just impatient? (No judgment, I’ve been there.)
- Is it terribly messy? Yes. But in a good way. Napkins recommended.
- Can I bake them instead? You could—but the texture is different, more like toast with cheese. If you’ve got a crowd, maybe it’s worth a try though.
And now, since you made it this far, I’ll tell you a secret: if you ever spill a drop of blueberry on your favorite shirt, club soda works better than anything else at getting the stain out. Ask me how I know!
Ingredients
- 2 slices sturdy sourdough bread (but honestly, white sandwich bread is fine—my grandmother swore by WonderBread…)
- 3/4 cup shredded mozzarella or Monterey Jack (I sometimes just use pre-sliced cheese when I’m lazy)
- 1/3 cup fresh blueberries (I’ve tried frozen too in a pinch; just thaw and pat dry—otherwise it gets messy!)
- 1 tablespoon softened butter (I use salted, but whatever you grab works—olive oil if you’re feeling fancy)
- 1/2 teaspoon honey (optional, for extra zing)
- Pinch of black pepper (surprisingly good, or skip if you’re not keen)
Instructions
-
1Butter one side of each bread slice pretty generously. If they’re a bit lumpy, don’t panic—just spread as best you can. (This is where my butter always tears the bread, but it sorts itself in the pan!)
-
2Flip those babies over so the unbuttered sides face you. Layer cheese on one slice, sprinkle the blueberries on top, and then, if you’re in the mood, drizzle with honey and a cheeky pinch of pepper. Top with the second slice, buttered side out.
-
3Heat up a nonstick skillet over medium (or whatever pan you have; I’ve done this in a cast iron, too). Once hot, drop in the sandwich. Press it down a little—not too hard, unless you like extra-flat toasties.
-
4Cook for about 3-4 minutes per side, checking to make sure it’s not burning (my brain always wanders here so set a timer if you’re like me). Flip with confidence! Don’t worry if blueberries leak and things get messy—the browner, the better.
-
5Once both sides are golden and crispy, remove from the pan. Let it sit for a minute (the cheese is basically molten lava at this point—I always forget and burn my tongue, oops).
-
6Slice diagonally so it looks fancy. Sneak a bite, then serve the rest (if there’s any left…)
Approximate Information for One Serving
Nutrition Disclaimers
Number of total servings shown is approximate. Actual number of servings will depend on your preferred portion sizes.
Nutritional values shown are general guidelines and reflect information for 1 serving using the ingredients listed, not including any optional ingredients. Actual macros may vary slightly depending on specific brands and types of ingredients used.
To determine the weight of one serving, prepare the recipe as instructed. Weigh the finished recipe, then divide the weight of the finished recipe (not including the weight of the container the food is in) by the desired number of servings. Result will be the weight of one serving.
Did you make this recipe?
Please consider Pinning it!


